The Noisy One

I’ve won a Dreadbox Typhon in a sweepstake, and it’s bloody brilliant. Like, really, really brilliant! A fun machine with a monster sound and a great concept for real-time sound manipulation and editing. If there wasn’t that nasty problem with digital noise.

Dreadbox Typhon powered from USB hub; preset A1

Just listen to it! It’s wonderful – but you will have noticed the nasty sound on switching it on, and the permanent high-frequency noise. (Oddly enough, it’s no longer in the recording as soon as the sequencer starts, but believe me – it’s there, all of the time.)

Digital noise, for sure.

Continue reading

I’ve put my modded IO Dock on eBay!

It’s the first ever IO Dock outside Alesis’ labs to feature a USB hub, it’s the most successful project in this blog, and I am selling it. 20140523-105055-39055060.jpg

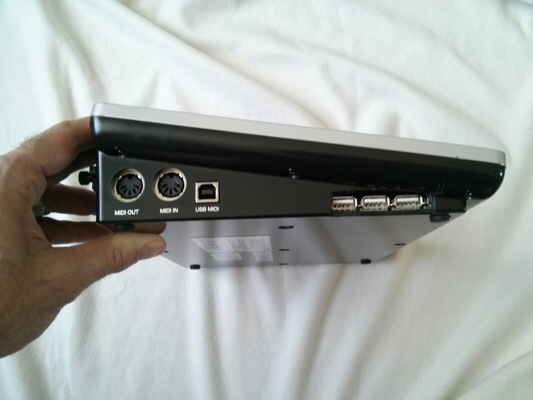
It was a simple hack on a crazy notion, and I’m really happy how it all turned out, getting noted by Discchord and Synthopia and others. More importantly, it’s a simple solution for a real problem, and it just works.

I’m also a lot more confident that it’s a good hack: The modified IO Dock has been in use at home and in the band for over a year, and the hack has been successfully replicated by some very smart hackers – over at Churchnerd’s blog you’ll not only find a description how to do it that is way better than mine, he also found a simple and elegant way to make the modded dock work with the iPad Air.

So why am I selling? I’ve got a good reason: Money. :) Apart from that, I am using an iPad Air now and switched over to another interface – a third-hand Novation X-Station keyboard/synth/fx combi with class-compliant USB Midi and Audio in/out. Best solution in the practice room for the time being, and if I’m getting a good price on my IO Dock, I might go out and get a Focusrite iTrack Dock to use at home.

However, I encourage you to try the hack for yourself, and I am confident that it will work with the new, lightning connector enabled, IO Dock 2. (Update: unfortunately, it doesn’t.)

A couple of things I have learned:

  • Some people are really scared by the bullshit warnings that advise you not to open the housing.
  • Anybody who can solder a cable can do it.
  • The hub matters. I was lucky to pick an active hub that works in my setup, a Belkin F5U404. If the hack does not work, and you have excluded switched in/out ports and messed-up USB connections as the cause, you may try another powered hub.
  • Use connectors, don’t solder it into the IO Dock – although you need 2mm pinstripe plugs/sockets like these that may be a bit hard to find, it is worth the effort: you’ll be able to test and reverse the hack.
  • Lab-test first. Dremel later. Before soldering or dremeling anything in the Dock, start with a simple workbench test – open the Dock, unplug the connector for the iPad, connect it to the hub with the modified cables you’ve made.
  • If you overload the IO Dock by drawing too much USB current, it just shuts down. So far, no harm has been done, still I think it’s a good idea to be careful and never connect more than one 500mA device.
  • When you are hacking the IO Dock anyway, you might think about adding a power-on LED connected to the hub’s 5V supply – I always regretted not having done this.

One thing left to do: Many, many thanks for all the feedback, the ideas and the improvement. It made it all worth while. Whatever the turnout of my auction is.

Tech Hack: Alesis IO Dock with USB Hub

Update, May 2014. I’ve put the unit on eBay. And I’ve summarised lessons learned from this hack here.

The Alesis IO Dock is a great product for iPad musicians – this small hack makes it even greater. It overcomes one limitation of the IO Dock: You can’t simply hook it to a USB hub. So I decided to build in an additional hub – which allows me to hook up additional class-compliant interfaces like my M-Audio Axiom master keyboard, and power them via the hub.

Yes, it works. No, it hasn’t been thoroughly tested yet. So try at your own risk.

The hacked IO Dock

The hack isn’t too sophisticated or demanding. Yet there are a couple of things we need to discuss before going to the step-by-step description. I’ve also tried to answer some questions that might arise in the FAQ.

What we’re doing:

We’re smuggling the USB hub into the connection between the iPad and the IO dock. (The video explains why.)

What you need:

  • A USB hub. Edit, 4-Jan-2012:  After giving it some more consideration I think that you might start with a normal hub rather than a powered one. (I used a powered hub Belkin F5U404.) This has certain limitations, though. Why? USB knows two basic types of port power – normal USB ports are supposed to deliver a 5V supply current of up to 100mA. That is enough to power simple interfaces and USB sticks. It is not enough to charge your phone, or to power a USB master keyboard.  So using a hub without power supply would normally mean that the iPad is not properly charged – but the way the iPad charges is actually hard-wired in the IO Dock’s iPad connector, so the iPad will charge even without a powered hub. (It is connected to the USB port’s input rather than to its output anyway).  IMPORTANT: As we will be using the IO Dock’s power supply, there are some limits to what we can drive with our hub. Please: See the FAQ. And I’ll have a more thorough look at the IO Dock’s power supply circuitry soon.
  • The hub’s connector cable. These cables have a flat A-type USB plug to go into your computer, and usually a micro-USB B-type plug like the ones for charging your phone (if you don’t have an iPhone, that is). We are going to cut up this cable and configure it to supply and interface the hub within the IO dock.
  • 2x 1.27mm 2mm grid pinstripe connectors – one 6-pin male, one 6-pin female. If you can, get connector strips with turned sockets; you can use them as plug and as female connector, like these ones. The original connector is like this one: [sample]
    EDIT, 19-Aug-13: Corrected the “these ones” link to RS Components. Also see FAQ section.  EDIT, 10-Sep-14: Modelmakers may look in their boxes for JST PH connectors (thanks Wolfgang!)
  • A small 100uF/6.3V capacitor – or something along these lines – as a buffer for the hub’s power supply. If you haven’t already, see the FAQ.
  • Basic soldering tools and skills. 
  • A Dremel tool to cut out a hole for the additional USB ports in the IO Dock.
  • Glue to fix the hub within the housing – I used a run-of-the-mill hot glue gun.
  • A class-compliant USB device for testing. (What’s that? See the FAQ.)
  • Approximately 2 hours to do it.

Me with a surgical mask and a Dremel tool

Not really a project for the aspiring Evil Mad Scientist – there’s hardly any rocket science involved – but especially the Dremel brought out my inner Walter White.

So let’s get started!

Continue reading

Asus EEE PC mit 12GB intern (V1.1)

[4.5.08: Da ich im ersten Anlauf eine falsche Spannung angezapft hatte – mehr unten – habe ich den Artikel komplett überarbeitet.]

Look, Ma, no hands!

Die internen 4GB reichen zunächst aus – spätestens, wenn man größere Dateien drucken will oder einen Teil seiner MP3- oder Filmesammlung mitnehmen, dann wird’s doch arg eng auf dem internen Flash-Speicher des Asus EEE.

Mein erstes Modding-Projekt versieht den Asus mit einer weiteren internen “Festplatte” in Form eines 8GB-Speichersticks. Dieser wird über USB angebunden, ohne einen der externen USB-Ports zu blockieren – und ohne den Akku des EEE nennenswert zu belasten.

Zeitaufwand: ca. 2 Stunden
Materialaufwand: 30 Euro für den Stick, ein paar Kabel, etwas Tesa
Nötige Fähigkeiten: Lizenz zum Löten

Also los!

Continue reading