Update, May 2014. I’ve put the unit on eBay. And I’ve summarised lessons learned from this hack here.
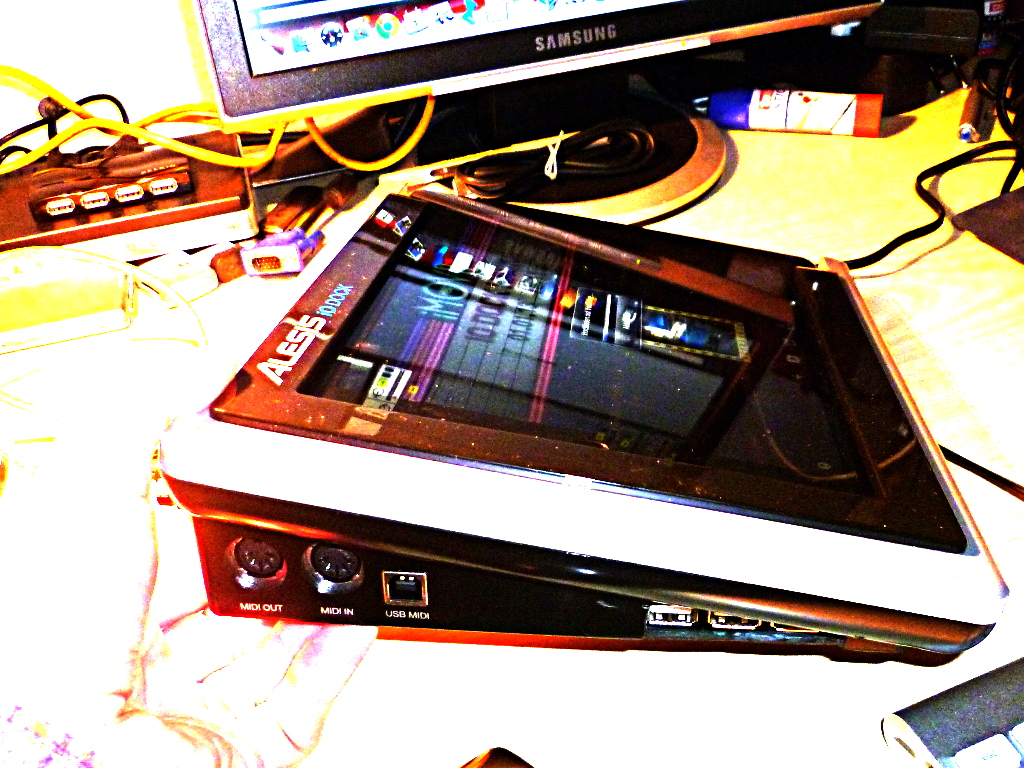
The Alesis IO Dock is a great product for iPad musicians – this small hack makes it even greater. It overcomes one limitation of the IO Dock: You can’t simply hook it to a USB hub. So I decided to build in an additional hub – which allows me to hook up additional class-compliant interfaces like my M-Audio Axiom master keyboard, and power them via the hub.
Yes, it works. No, it hasn’t been thoroughly tested yet. So try at your own risk.
The hack isn’t too sophisticated or demanding. Yet there are a couple of things we need to discuss before going to the step-by-step description. I’ve also tried to answer some questions that might arise in the FAQ.
What we’re doing:
We’re smuggling the USB hub into the connection between the iPad and the IO dock. (The video explains why.)
What you need:
- A USB hub. Edit, 4-Jan-2012: After giving it some more consideration I think that you might start with a normal hub rather than a powered one. (I used a powered hub Belkin F5U404.) This has certain limitations, though. Why? USB knows two basic types of port power – normal USB ports are supposed to deliver a 5V supply current of up to 100mA. That is enough to power simple interfaces and USB sticks. It is not enough to charge your phone, or to power a USB master keyboard. So using a hub without power supply would normally mean that the iPad is not properly charged – but the way the iPad charges is actually hard-wired in the IO Dock’s iPad connector, so the iPad will charge even without a powered hub. (It is connected to the USB port’s input rather than to its output anyway). IMPORTANT: As we will be using the IO Dock’s power supply, there are some limits to what we can drive with our hub. Please: See the FAQ. And I’ll have a more thorough look at the IO Dock’s power supply circuitry soon.
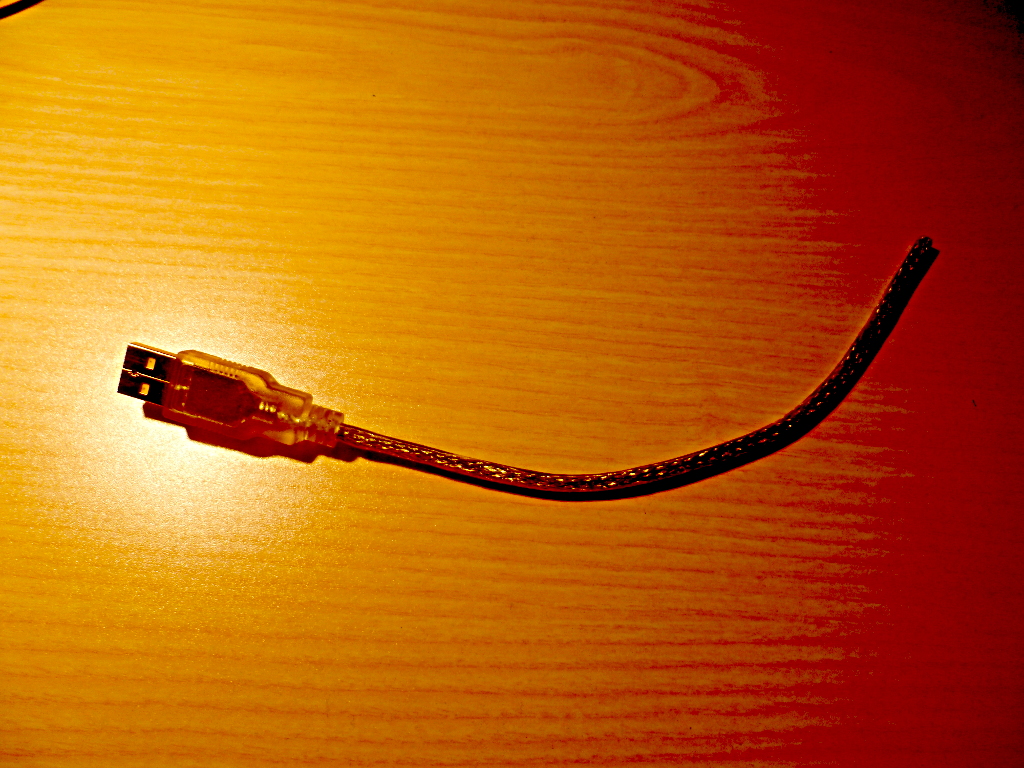
- The hub’s connector cable. These cables have a flat A-type USB plug to go into your computer, and usually a micro-USB B-type plug like the ones for charging your phone (if you don’t have an iPhone, that is). We are going to cut up this cable and configure it to supply and interface the hub within the IO dock.
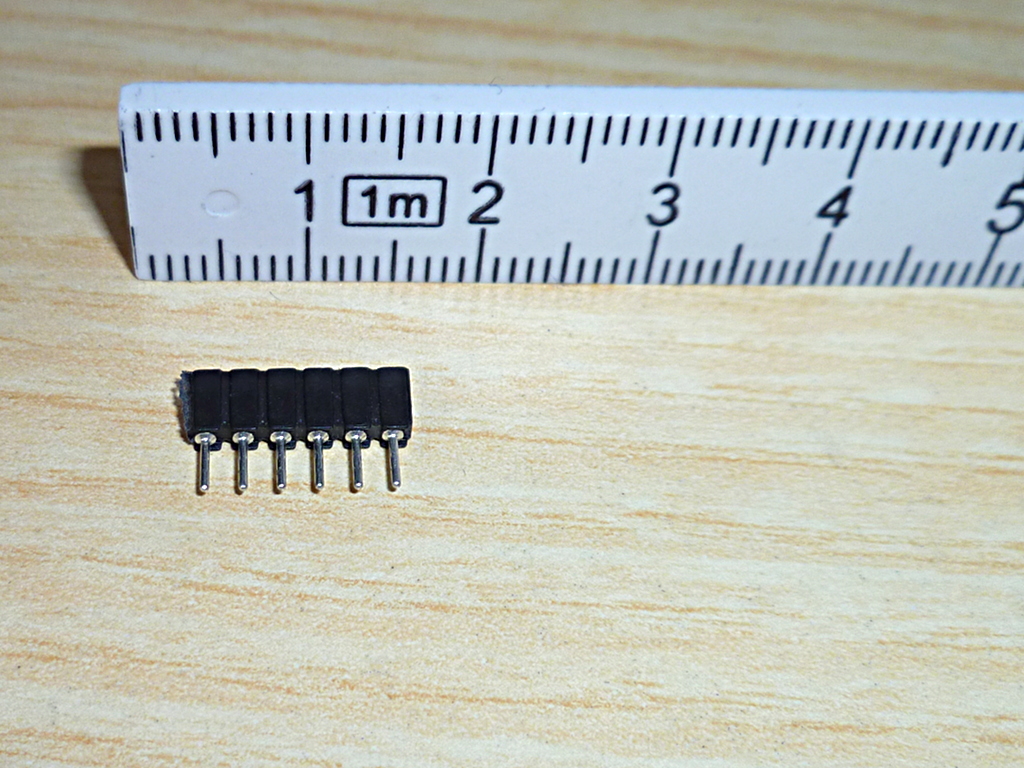
- 2x
1.27mm2mm grid pinstripe connectors – one 6-pin male, one 6-pin female. If you can, get connector strips with turned sockets; you can use them as plug and as female connector, like these ones. The original connector is like this one: [sample]
EDIT, 19-Aug-13: Corrected the “these ones” link to RS Components. Also see FAQ section. EDIT, 10-Sep-14: Modelmakers may look in their boxes for JST PH connectors (thanks Wolfgang!) - A small 100uF/6.3V capacitor – or something along these lines – as a buffer for the hub’s power supply. If you haven’t already, see the FAQ.
- Basic soldering tools and skills.
- A Dremel tool to cut out a hole for the additional USB ports in the IO Dock.
- Glue to fix the hub within the housing – I used a run-of-the-mill hot glue gun.
- A class-compliant USB device for testing. (What’s that? See the FAQ.)
- Approximately 2 hours to do it.

Not really a project for the aspiring Evil Mad Scientist – there’s hardly any rocket science involved – but especially the Dremel brought out my inner Walter White.
So let’s get started!
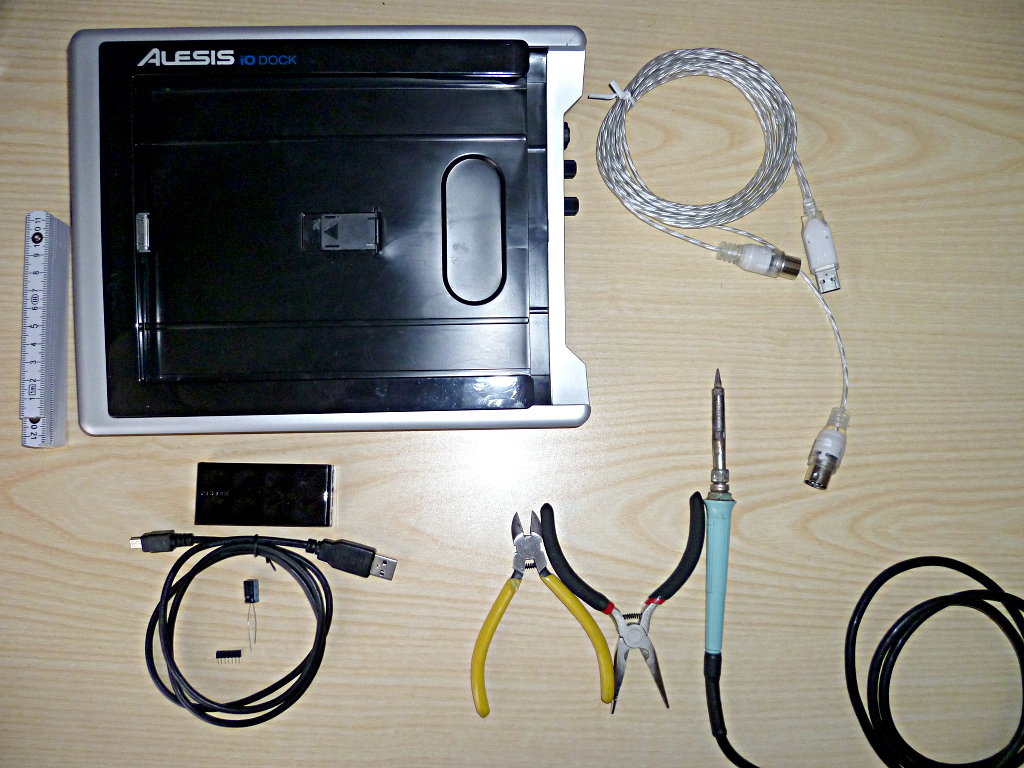
Our bill of materials.
It’s possibly a good idea to check whether your IO Dock has the latest firmware, and update, if necessary. Latest known version is v1.0.7. Earlier versions have been known to contain bugs.
I used this type of socket strip with turned contacts rather than the usual square type because they can double as a male or a female connector. You can just as well use a regular 6-pin socket and a 6-pin grid stripe connector, as long as they are in the 2mm grid.

Prepare the hub: Break it out of its housing.
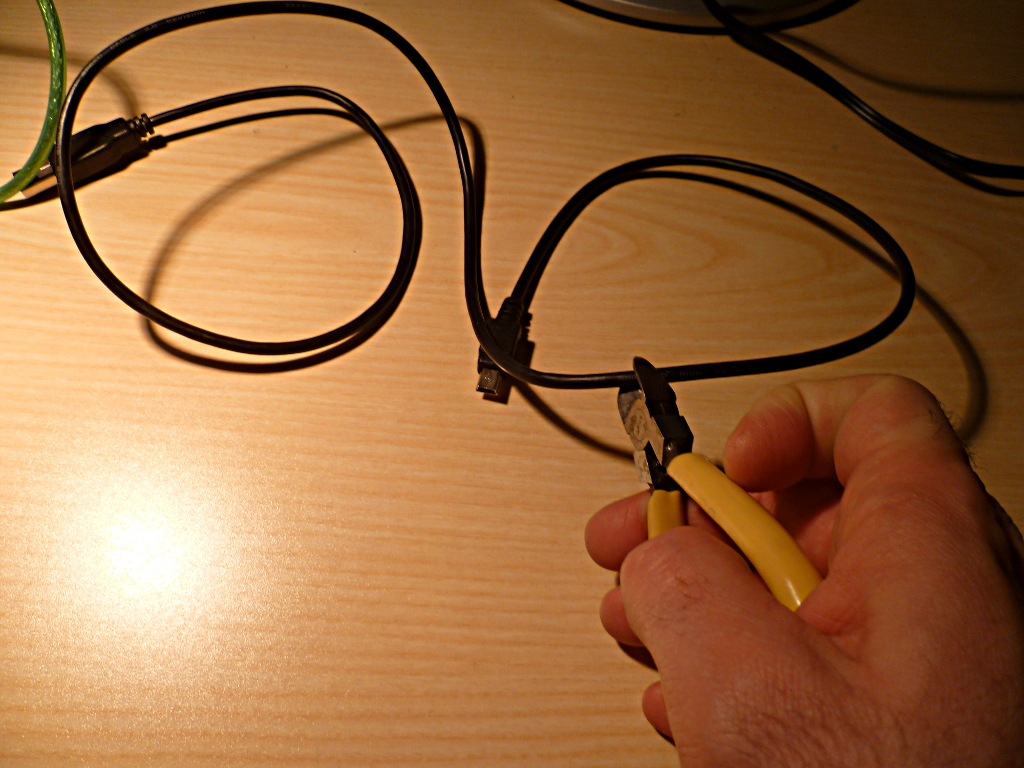
Cut off the micro-USB plug with approx. 15cm of cable. We’ll turn this into the connection to the iPad, and it’ll get a female connector to replace the internal IO Dock cable.

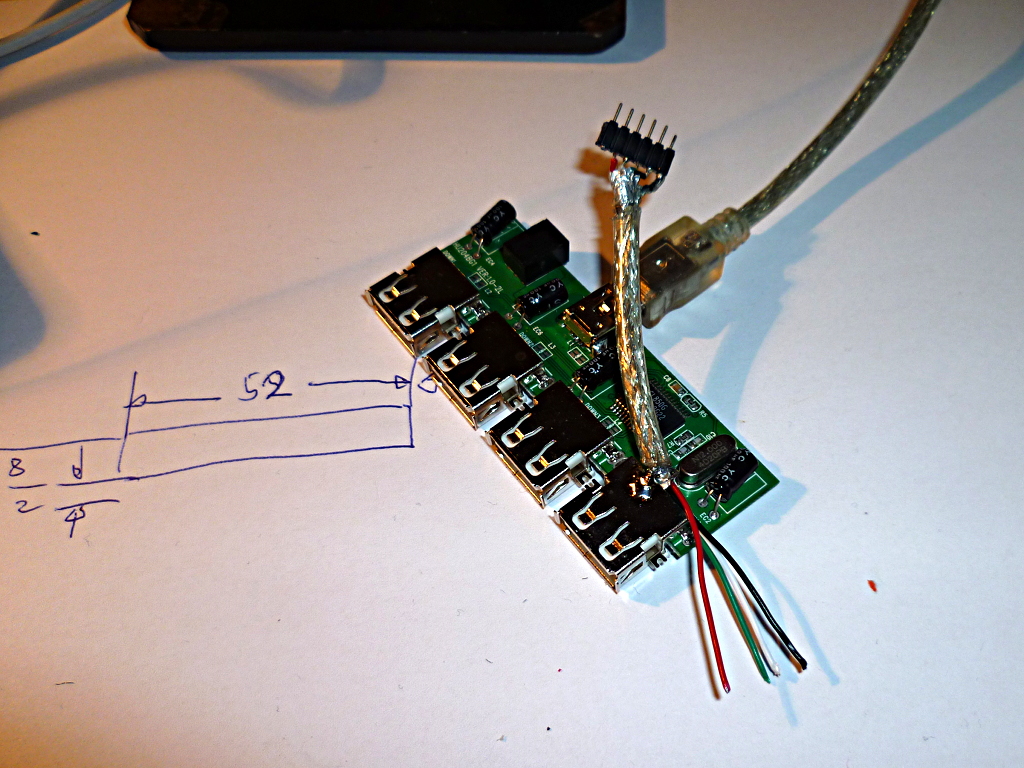
Solder a cable like this one.
First soldering task: solder a female connector to our mini-USB connector cable. Getting the pins right is easy – the cables are colour-coded, so just solder them in the same order as they are with the IO Dock’s internal cable. From left to right: (1) Red/5V (leave unconnected), (2) Red/5V, (3) White/D-, (4) Green/D+, (5) Black/GND, (6) cable shield.
Cut off a length of the remaining USB cable. Attach the male connector to it.
To keep things simple, I just soldered this cable to the hub’s board. You could just as well make a cable from remainder of the USB connection, with the plug, and plug it into one of the hub’s outputs.
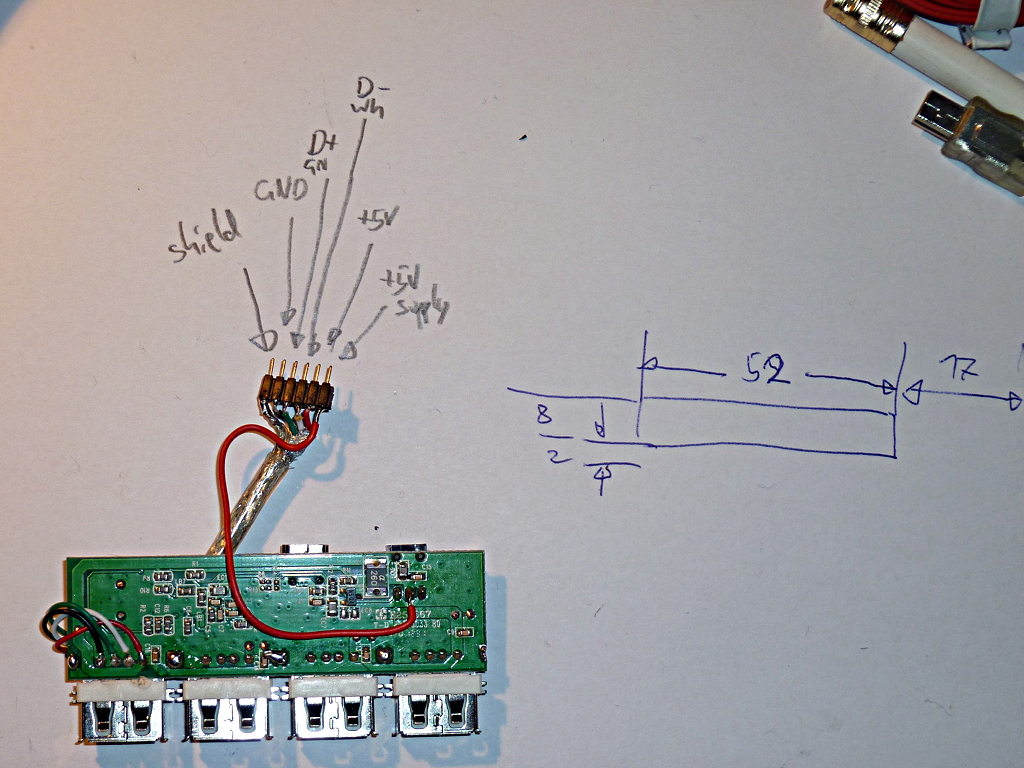
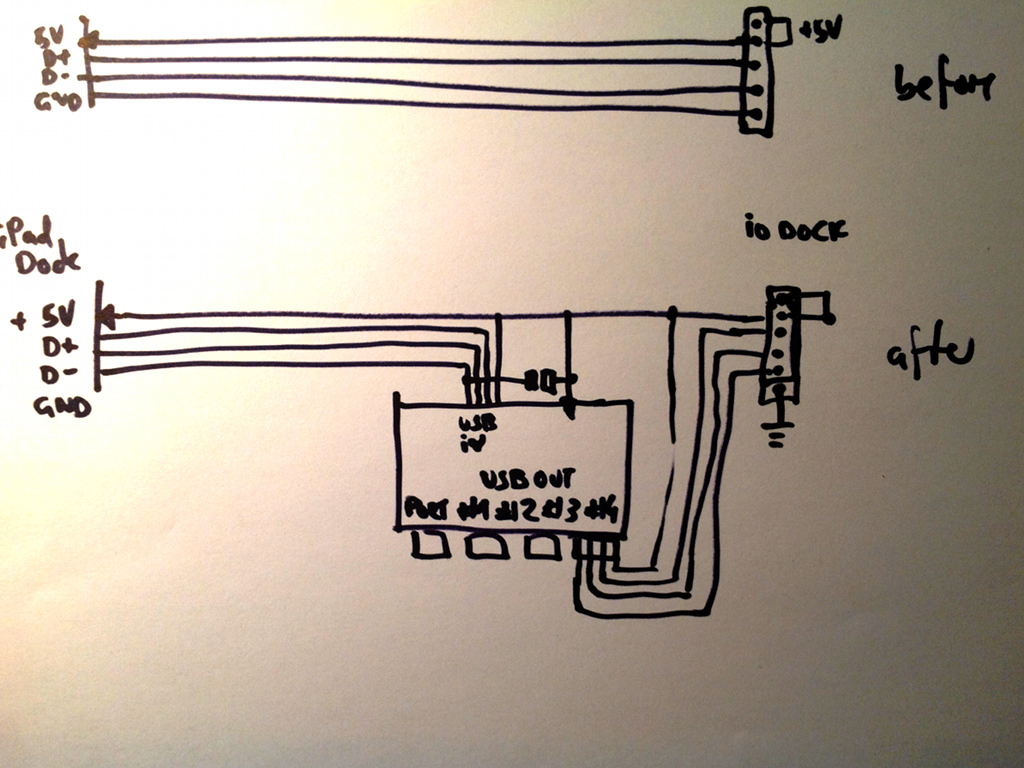
Once again, really simple colour coding. Copy the IO Dock’s connector or use my diagram here.
You see that I soldered in an additional wire: it connects the hub’s plug for the power supply (the plus line, that is) with the IO Dock’s +5V supply line. This is a bit dodgy, technically speaking: I had done a litte workbench test with the Belkin hub I’m using and noted that it worked almost too well: my iPad was still charged, now through the hub’s +5V power supply. So I simply replaced the external power supply by a connection to the IO Dock’s internal +5V bus.
So the iPad gets its supply current through the input plug of the Belkin hub now. If this does not work with the type of hub you’re using, you may have to cut up your hub’s connection to the input plug’s +5V terminal and rewire it to the +5V of the output plugs.
Whatever you do: don’t forget to solder in the buffer capacitor on the +5V line. I did, so it’s not in the photo yet.
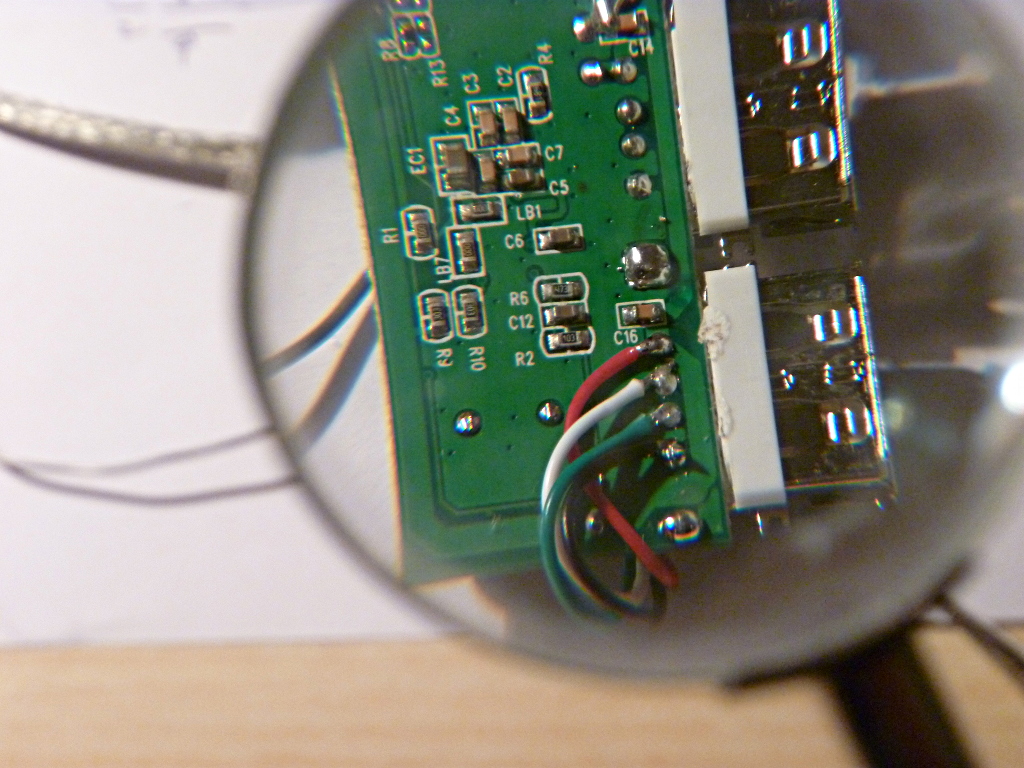
As I said before, I just soldered the connection to one of the hub’s USB ports.
This what remained of the one I used. The seasoned hacker ties cable cuttings like this one around his neck to instil fear in accountants.
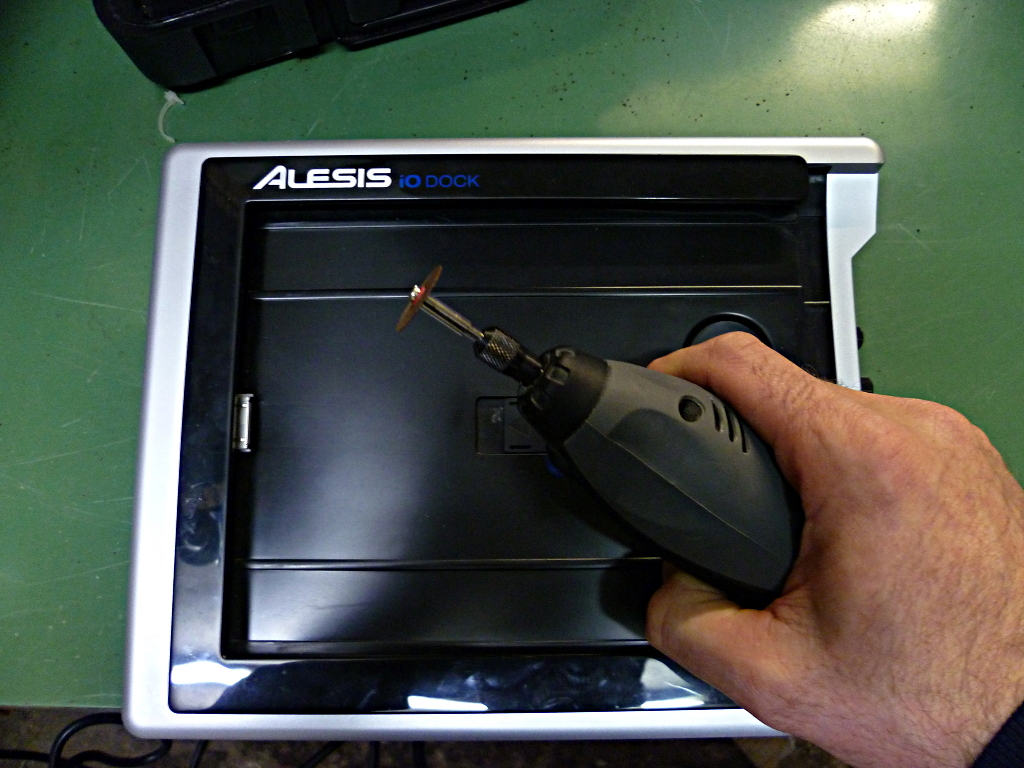
Next step: get your Dremel running and cut a hole for the USB ports.
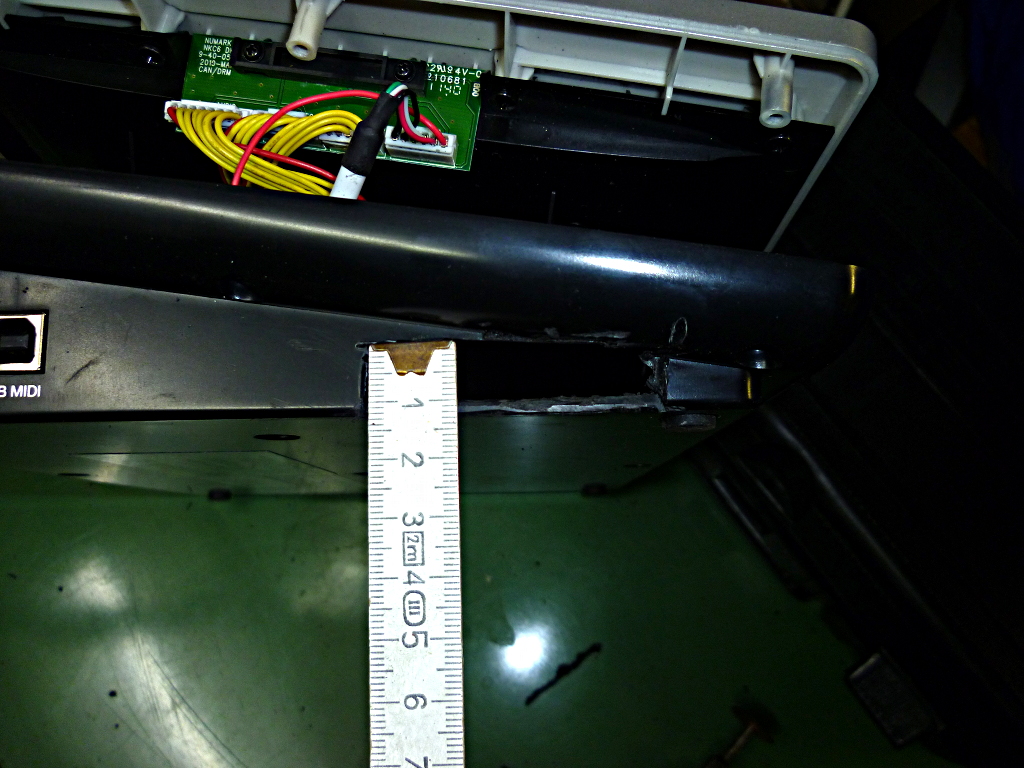
In my case, I cut a hole that was 52mm wide and 8mm high, 17 mm from the lower edge of the IO Dock. BTW: Don’t turn the Dremel up too high, or you will melt the plastic rather than cutting it. Go for a rather low speed setting.
There’s the hole where the USB ports will go.
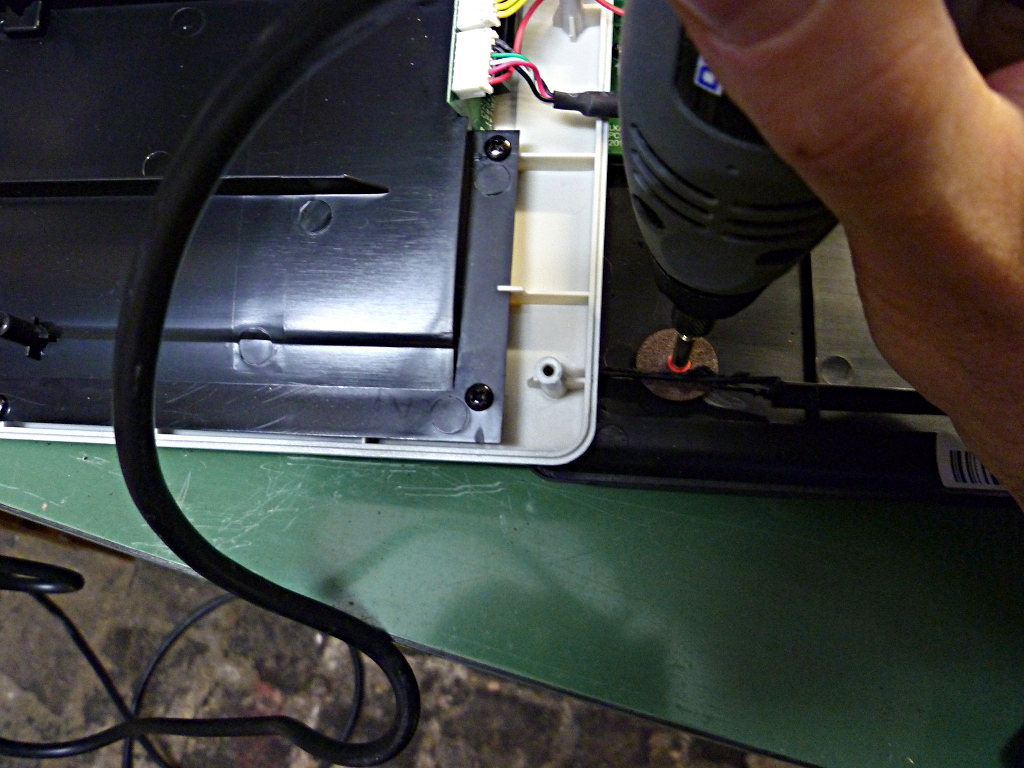
You’ll have to do a bit of cutting on the inside as well – remove the plastic edge where the hub goes or it rests too high for the ports to fit the hole.
Just to remind you, this is what we’re doing:
Smuggling the USB hub into the internal path.
After sticking it together – maybe try a little workbench setup first – test it: Does the IO Dock still work? Does the iPad still charge?
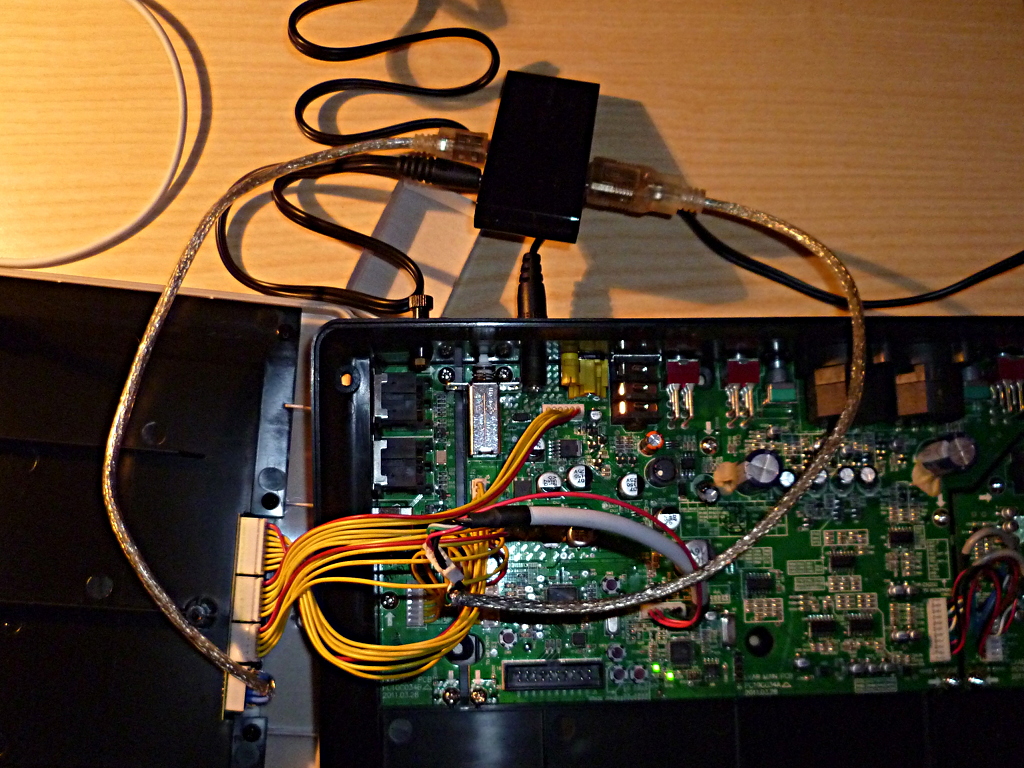
The hub just plugged into the internal connections of the IO Dock but not yet mounted.
If the iPad doesn’t charge, you need to solder an additional power supply wire from the hub’s power supply input (where you soldered the single connection wire, you remember) to the USB micro plug’s +5V port.
The putting it all together thing in a short video.
FAQ
One of my Evil Mad Scientist skills: Reading your mind and coming up with the answers for the questions you haven’t even asked yet. Muhahahaha!
Does it work with my [insert gadget here]?
It will, as long as the USB device is class compliant. That means: It follows a standard that the iPad and other computers know, so that there are no additional drivers needed to get it running. A USB-to-Midi interface, for example, or an audio interface, a USB keyboard, or a foot controller. It might not work with the fancy flux compensator control you just bought on eBay, along with a floppy disc holding the drivers. Take a look at this device list over at iosmidi.com (no longer online, archive copy here.)
Another consideration is how much power the device needs. We’ll get to that in a minute, for the moment just remember that you probably shouldn’t defile the IO Dock by hooking up a mug warmer or a fan to it.
What type of connector did you use? Where can I get it? And why do you list only sockets, no plugs?
Another excellent question. As noted before, I had 2mm SIL pinstripe sockets lying around in one of my parts boxes, so I did not think much of it. From the feedback I realised that they are not that easy to come by. Normal IC sockets are in the 2.54mm grid, so 2mm grid SIL sockets are hard to get a hold on. I’ve found them in RS Components’ Online Catalog; unfortunately RS is not too keen on selling to private persons, but at least that means that the part is out there, somewhere. (There’s presumably another source on eBay, thanks Shep for commenting on this.)
And why didn’t I tell you to order socket plugs as well? Same reason, really – as a hacker, you use what you have. And turned sockets are excellent as plugs; just solder the cable to the socket side rather to the pin.
Is the IO Dock really capable of powering three additional USB loads?
Good question, actually. No, really. You may know that an iPad charging can draw a pretty hefty current – 2.1A, as far as I know. The IO Dock’s power supply is capable of delivering up to 3.0A, so wiring three 500mA loads to it – a USB/Midi keyboard, a Maschine-type controller, and a light – will drive it over the edge. Well, sod and burn the power supply, but the IO Dock’s internal supply voltage comes from a regulator, and you wouldn’t want to burn that.
In my first experiments I hooked up a device that, while switching on, seemed to produce a spike current that demanded just a little bit more than the hub could supply – and this caused the hub (and the dock) to lose its power. I drew three observations from that: (1) Better add a buffer capacitor for the hub. (2) If you switch on the IO Dock with the load already connected, it works. (3) The IO Dock’s internal regulator is possible short-circuit proof, but no guarantee for that. It may still burn.
Scared now? You should be. I’m pretty confident that you are OK with one 500mA load (i.e. one device that only works on a powered hub, not on the camera connection kit itself) and two small loads like MIDI interfaces, but don’t blame me if anything goes wrong. We’re absolutely doing this on our own risk – I do, you do. Consenting adults, you know.
Does the USB port for connecting the iPad to a computer still work?
Oddly enough, no. Which makes it all the more surprising for me that the hack actually works – a normal IO Dock seems to drive the iPad as slave rather than as a master, so once you force the iPad to be master, it won’t sync. (Theory.)
What the IO Dock still does when you plug it into a computer: It registers as an audio interface. Here what a Linux machine tells me:
[14339.660194] usb 5-1: new full-speed USB device number 2 using uhci_hcd
[14339.818328] usb 5-1: New USB device found, idVendor=13b2, idProduct=0020
[14339.818343] usb 5-1: New USB device strings: Mfr=1, Product=2, SerialNumber=0
[14339.818353] usb 5-1: Product: Alesis iO Dock
[14339.818363] usb 5-1: Manufacturer: Alesis
[14339.866455] usbcore: registered new interface driver snd-usb-audio
Does the IO Dock’s MIDI and Audio interface still work?
Hell, yeah! That’s what it’s all about, isn’t it?
What if I don’t want the hack any more? Is it reversible?
Yes. Just unplug the hub, replug the IO Dock’s USB connector plug, and everything is the way it used to be. That’s why we did it with connectors rather than with the usual brute-force cut-the-wire-solder-it-in-to-hell-with-tomorrow approach.
You can even try it out before cutting a hole into the IO Dock’s housing. I did this in my proof of concept.
I’m scared of messing with my shiny new IO Dock.
Well, then this is not for you. And did you know that there is a huge sticker on the back of the IO Dock warning of the shock hazard if you open it? Dangerous 48 volts of phantom power inside, you know…
Pingback: Alesis IO Dock Hack Adds An Internal USB Hub |
Pingback: Alesis iO Dock Hack: USB Ports für MIDI-Controller.
Thanks a lot for this guide, I’ve started with it myself but I can’t find the connectors that fit the white connectors on the IODock’s cable. Do you have to have a product number or model that I can use to order it from somewhere? Thanks!
Do you thing i can do the same thing with io dock 2
I will bye it only if it’s possible !
thanks for answer !!!
Eric
I doubt it, a couple of people tried and failed (see comments under this article).
@Geert: Oh, I’ve just discovered I made a stupid mistake there. Taking them from my odds&ends box and seeing they were smaller than the usual 2.54mm grid ones, I assumed they were 1.27mm grid, but they are not. Use 2mm grid connectors, pretty much like what you can get here: http://de.rs-online.com/web/c/?searchTerm=stiftsockel+2mm&sra=oss&r=t – really sorry for that.
Thanks, I already figured out that the grid was 2mm instead since I had some 2.54mm headers lying around and they didn’t fit. What I can’t find though, are the ones you’re showing in the pictures, that can be used both for male as for female, just based on how you solder them. I’ve looked through RS and Farnell, but I can’t find them. Would you mind narrowing the search terms a bit down for me to help? I’d really appreciate it.
I think these are the same ones, I ordered the minimum quantity from Farnell and will report back if they fit: http://www.jst-mfg.com/product/detail_e.php?series=199
Geert, I realize I was pretty lucky to have a couple of those 2mm turned contacts in my leftovers box, I didn’t have any more luck to find new ones. Glad you found a source. Let me know how the hack turns out with you.
So the JST plugs I posted earlier work fine, it’s a bit of a drag since they’re crip connectors and the crip tool costs a lot of money, so I soldered them instead.
My problem now is that I’m sure the cables are fine, I basically built two socket A USB cables, one female and one male, so I can just plugin them into each-other to restore the direct connection from the iODock to the iPad. When I do that, it charges and everything appears correctly. However, I’ve already tried two different USB hubs, and they don’t work, even when I power them externally. I’m going to try to get some more to test, but I wonder if you can think of something that might shed some light on this. I find it very weird that it just stops working with any USB hub in between.
Thanks,
Geert
Hello Untergeek, I am an automotive engineer, and I just had our JST representative send me samples (20 of each) of pins, as well as male, and female connectors that are exact matches that mate perfectly with the ioDock’s connectors! I also have the JST crimp tool, so I am in business! WOOHOO! :D
Hi Geert, this would be my check list:
1. Is the hub really connected the right way round? Remember: the iPad has to be connected to the IN plug of the hub, the dock to one of the four OUT plugs.
2. Try the iPad and the hub without the IO Dock. If everything is OK, the iPad will find any class-compliant device plugged into the hub – try it with a USB keyboard.
3. If it doesn’t (or if it does but the IO Dock won’t answer), check whether maybe you just plugged the connectors the wrong way round.
4. Triple-check whether the USB signals are wired correctly. Check the colour codes: the d+ signal (green cable), the d- signal – you may have switched them accidentally.
Hope that the answer is somewhere in that list.
Hi,
First thank you for the good description.
I have a problem with this.
I did everything as you described on this page. Now all kind of midi devices are working fine and the iPad is charging BUT the audio is not coming out of the dock anymore, instead its coming out of iPad Speakers… :( what can I do to fix this, please help me. Regards Stefan
@Stefan: I suspect that it’s something very simple like the iPad not being properly connected – if you, like me, use the iPad 3 without the proper adapter, it takes some force to slot it in.
Also try switching the Dock off & on again – this helps the iPad rediscovering the Dock hardware. If everything else fails, try connecting the Dock to a computer (via the built-in USB/B port); the Dock should register as an USB audio interface. If it doesn’t, I’m afraid there’s something wrong with the hardware.
BTW: did you update the Doc to the latest firmware? Releases earlier than V1.07 are known to have issues.
Hi, thanks for that fast answer!
I tried your tips.
Power on/off does not help
Its correctly connected, otherwise the iPad would not charge
And when I connect it to a PC, it recognizes a device
But still the sound comes from the iPad…hmm
Have you tried updating the firmware? And what kind of hub did you use?
I guess for the time being, the only thing you can do is reconnect the iPad connector to the Alesis board. If that restores everything, your hardware is OK and it’s only a weird glitch with this special USB hub. Sorry about that – but there’s not much more I can think of.
Good job… Now all we need id a lightning connector mod ;)
Buy me an iPad 4 and I’ll start right away… ;)
It’s going to be ending of mine day, however before end I am reading this fantastic post to increase my experience.
Hi there!
Thanks for the great post! I don’t have an Alesis dock, but I’m trying to use an Sonoma GuitarJack2 audio interface as I charge the iPad. I want to try modify an extension cable so I have a +5V input between the the interface and the iPad, do you think I can use the same method, putting a capacitor and a +5V source as you did with the dock? Or it may burn something – the interface or the iPad.
Many thanks again for all the info you have shared!
Sorry Paulo, Erasing spam comments I discover that I missed answering yours. — I’m indeed pretty sure that this should work, and there is not much potential harm in trying out – provided you have a thorough look at http://pinouts.ru/PortableDevices/ipod_pinout.shtml and make sure there are no short circuits.
Thanks for answering! I’ve already made an adaptor to use an audio interface and a Griffin Stompbox, and it worked lovely. I’ll try it asap, since power is the main problem with my rig. I’ll just bug you with one more question: What kind of capacitor should I use? I’m not much into electronics – just enough to rebuild electric guitars etc – so I have no idea which kind of capacitor I should use. 100uF/6.3V is clear, but I think you didn’t mention if I has to be ceramic, eletrolytic etc. Can you clear this for me?
Thanks again for all that info!
Electrolytic. Cheaper.
Would something like a USB A Female to B Male Adapter work to run a keyboard or a mic? or does the master slave thing stop it? (Or maybe there needs to be power and there isnt idk). Thanks
Hey Unter! I just saw your video on this hack, and while it seems rather basic, I don’t plan on trying it. I was curious about the USB-A female to USB-B male converter though. Would that allow me to plug in my Axiom 25 to the iO Dock without issues? Also, if it does work, does this mean I could plug in a powered USB Hub and have other devices plugged in as well?
Does this converter contain an USB controller, or is it just one of those we’ll-wire-it-anyway-and-try-if-it-works devices? In that case, no chance. You’ll need a USB bus host somewhere, and the Dock’s built’in USB connector won’t work as one.
(Sorry for the long delay before replying – somehow I skipped this comment.)
Geht das auch mit dem neuen behringer istudio?
Ach, gibt’s das endlich? Dachte immer, das sei Vaporware… <thomann>Tatsächlich!</thomann>
Also, versucht habe ich es nicht. Meine Spekulation wäre aber: ja, einen Versuch wär’s wert. (Vielleicht erst einmal so einen hier, der noch nichts kaputt macht.) Das iPad, das wissen wir, arbeitet als USB-Slave und als USB-Master. Ich würde darauf spekulieren, dass es auch das Behringer-Dock tut (wenn die Chinesen das Alesis-Ding werkgetreu geklont haben).
Was dagegen spricht, ist ein Kommentar, den ich mal auf Youtube erhalten habe: Da hat jemand, der wohl bei Alesis gearbeitet hat, behauptet, dass das ursprüngliche Alesis-Design genau so einen Hub vorsah, wie ich ihn eingebaut habe. Das sei aber an den Vorgaben von Apple gescheitert. Es gibt keinen Grund anzunehmen, dass Behringer ohne Not den gleichen Aufwand getrieben hat.
Aber probieren würde ich das auf jeden Fall. Und zwar mit der iPad-4-Variante!
Update: hier versucht das offenbar gerade einer. Elantric aus dem VGuitarForum hat alle Teile zusammen und will das iStudio umbauen.
Hey Untergeek,
Just wanted to say thanks for this guide I had to wire mine up a few time like you had your PoC to be sure it would work and I just spent about 2 hours jamming using Jam up pro and this 50$ USB Midi foot switch I got off ebay.
It allows me to program each of the buttons for a who preset rig or assign some to effects if I need it for the song.
Anyways one thing I ran into is as I was testing and working on it the only way I could get the dock to recognize was to wire the 6th wire (+5v) directly from the mainboard over to the Ipad jack.
I am not an electronics guy but this does not seem ideal. Also, I get some very stange behavior if I shut off the dock/hub in the wrong order. Last time it froze the Ipad in LoopyHD and I had to restart it.
Any thoughts on my hack on a hack?
Mike
re the 5V wire: This is basically what I found, and what I did. (Presuming that by “6th wire” you mean the Dock’s +5V supply rail rather than the shielding.) Sorry for not expressing this more clearly; have a look at the schematic.
Concerning the dodgy behaviour, don’t panic. I’ve been running the modded IO Dock for over half a year now, and these are my observations:
– Sometimes, you have to switch the IO Dock off and on for a couple of times. Look for the “Charge” symbol on the IO Dock to light up (meaning the Dock is now connected), then everything is fine. The IO Dock’s internal regulator obviously needs more time to stabilize with the additional load from the hub and the USB peripherals.
– Most hacks don’t like the switch from internal audio (i.e. headphone outputs) to external USB audio, like the one the IO Dock supplies. In my experience, Loopy tends to be irritated for a couple of seconds, so the best way is to switch on the IO Dock before starting Loopy. It does, on occasion, go back to normal behaviour. (I tend to get recordings with digital noise though, with Loopy and with Auria, and have to restart the Dock and all apps before it’s back to normal.)
– Once things are running, they are stable, and I am confident that there is no danger to damage anything.
Hope that helps. Nice setup with JamUp Pro.
Kann ich da auch noch nen HDMI Adapter zwischenhacken? Die gibts ja auch als “Durchschleifadapter” und als Endgeräteversion. So viele Pin’s werden’s wohl nicht sein, oder?
Probieren! Vielleicht der Einfachheit halber den hier (http://store.apple.com/de/product/MD098ZM/A/apple-30-poliger-digital-av-adapter) zwischen das (unmodifizierte) IO Dock und das iPad schalten. Wenn’s geht, geht’s auch mit dem Hub.
Allerdings sehe ich ein mögliches Problem. Wenn ich mal wild spekuliere, vermute ich, dass der Adapter aktive Hardware enthält, die das HDMI-Signal generiert und dabei auch aktiv von der Firmware des iPads unterstützt wird. (Der Composite-Video-Ausgang, den auch das Dock durchschleift, wird ja nur dann angesteuert, wenn die App ihn unterstützt, der HDMI-Ausgang ist immer aktiv.) Es ist möglich, dass die Apple-Firmware USB und HDMI Out parallel nicht unterstützt. Unwahrscheinlich, aber möglich.
Ich hatte jetzt den hier besorgt:
http://www.amazon.de/Connection-HDMI-Port-AV-Anschluss-Micro-USB-Kartenleser/dp/B0085MJYN4
Wie der jetzt komplett integriert wird, muss ich mir noch überlegen.
good afternoon, Me sorry by the translation liked very of your video on youtube about installation of doors usb in iodock alesis, would like that get me out one doubts. you’ve used it to record a live show that will recognize a mixer, in my case I have a mixer behringer X32 already make recordings using a camera adapter on ipad2, along with auria and record it shows perfectly, and I bought a iodock disappointed to see that it’s impossible to connect the mixer directly, something else would also whether to use any of the 4-port hub because here in Brazil can not find the brand and model that you specified in the video, if you can help me would be very grateful ….
Any powered hub may work. My advice: Solder the cables, open the IO Dock, and try. If it works, go ahead and build the hub into the housing.
If the Behringer works with the Camera Connection Kit, it is class-compliant and works with the mod as well.
Been looking at and reading about your hack for a few weeks and want to do it. But I have a question. In an update edit of Jan 4th 2012 – you said, “After giving ity some consideration I think that you might start with a normal hub rather than a powered one.” Can you please explain this over the powered hub? And let me know which you think is the best?
Thanks ahead of time,
Shep
This is why: A powered hub gives peripherals the impression that they may draw up to 500mA per USB port. While this is not really a problem per se for the IO Dock, charging an iPad (approx. 2A) plus supplying three 500mA devices clearly is.
Although the IO Dock’s power supply circuit seems to be protected against excess currents (from what I can gather by looking at the components), I wouldn’t bet my IO Dock on it – so it’s possibly better to use an unpowered hub, which is supposed to supply a maximum of 100mA per channel. For most devices – additional MIDI interfaces, keyboards with USB interfaces, USB mikes – this should be enough.
Pretty convincing, isn’t it? As you have noticed, I didn’t stick to my own advice, as my Axiom controller needs the 500mA supply. Meaning I’m extra careful not to use anything else that is that power-hungry. Works.
Overall, I guess it depends how disciplined (and risk-averse) you are.
Thanks for the ebay link, will put that into the FAQ.
We tested the BELKIN hub without power mains adapter with the Axiom 49 2nd Generation and it worked. In passive mode the belkin should deliver 100mA as well, right?
Si, Señor!
I just wanted to add that I found connectors here with free shipping: http://cgi.ebay.com/ws/eBayISAPI.dll?ViewItem&item=121158885416&ssPageName=ADME:L:OC:US:3160
So, am I correct in thinking that if we use a non-powered hub that we simply omit the additional red 5v + wire?
A write-up of a non powered hub would be great :)
Well, yes. And I’ll do the write-up when I’m patching an IO Dock so work with the Lightning connector. (Meaning I’d have to buy a new iPad first. May take a day or two.)
LOL – I hear ya!
BTW – it also seems like it might be an easy thing to do to wire one USB with power and the other’s without. Just a thought.
I have 2 IoDocks I want to modify. My question is will all 4 of those hub ports work for connections? I see you are only using 3 maybe because of limited mounting space in the Dock?
Have a look at the wiring diagram – you’ll need one port for connecting the iPad, that’s why :)
Thanks, yeah I don’t know much about the hub design, I didn’t know if the ports are wired in series or had their own dedicated processing.
Also, how is the glue holding up? I would hate to have to open the dock before a show if the glue gave way :-)
Holding up well.
Thanks for sharing. Do you think it would be an easy hack to fit the dock with a lighting cable to accommodate iPad 4?
Or should I just save my money for an alesis io mix?
I think it would be a worthy one. :) I’m going to do this one day – an iPad 4 is definitely the next step, it’s got almost double the processing power of all earlier devices – and Alesis has made known that it works, even if they’d never support it of course.
The biggest obstacle would be to glue and solder the lightning adapter in a way that looks nice. Might be a bit tricky, but if you’ve done a DIY project or two I’d guess it’d be extremely rewarding.
Great hack, man. Was wondering why alesis didn’t put normal A type USB for class compliant midi devices.
Because of editions of the post i’m confused: am I needing powered usb hub or conventional usb hub can power standard low-voltage devices?
If I want to use conventional usb hub – am I needing to connect +5V from io dock power? Am I needing to solder the capacitor. I think: no and no. But, I’m confused.
Thanks in advance.
There’s a guy on the internet who claims that Apple wouldn’t let Alesis do it…
re +5V: There is a class of USB hubs that works as powered hub (i.e. up to 500mA per port) when the +5V input is connected, and as a passive hub (i.e. 100mA per port) when this input is open. Yet even a passive hub needs +5V supply of course – and the iPad needs to be connected to +5V anyway. It’s possibly best to try what works.
Hi,
This mod looks great, but a little too complicated for me.
I was just wondering if I could use a simple usb adapter A to B connector (like the one here: https://www.distrelec.ch/adaptateur-usb-a-b-f-m/maxxtro/mb-5730/674120/informatique/fr), so that I could plug in my Akai mini keyboard…
Would it work, or is a usb hub absolutely necessary?
Thanks in advance for your response!
Alexandre
Hey Alex, couldn’t open the link but my guess is that it wouldn’t work, for the reason stated in the video: The Akai needs a USB master, which the Unmodified IO Dock isn’t. But then, you never know. Give it a try but be prepared to ask them for a refund on the A/B adapter… :)
Hi folks!
I purchased recently a is202 and I will try to do the hack soon but I have to finish some others first.
Meanwhile I opened it and take some photos that I want to share and comment.
http://www.flickr.com/photos/31264356@N03/sets/72157636014065004/
I hope you like them and find useful, I still not had a deep look into them but they seem reveal some interesting things on the pcb board.
At the pics you could notice a space for 5 pin connector near the chip (CY8C3446-PVI) which datasheet could be download at
http://pdf1.alldatasheet.com/datasheet-pdf/view/315995/CYPRESS/CY8C3446PVI-076.html
But unfortunatly it seem not related with USB communication (Anyone could explain what we could connect at these ompamp and SIO pins?) so…
We could do the same trick but the cables from alesis jtag tipe (those ones which seems a bit complex to find) were substuted by (far by easy) olimex flat cables (I deal with them early hacking my korg nanopad 1 and they are a pain in the ass and expensive but almost I learnt few things about them that I will be glad to share with all of you mates ;))
Next step?
I answer myself… 8B
I noticed anotheor chip near usb output port (seems an atmel… But I could decypher the name my early attempt) which has some pins linked to another connector (jtag like)… Maybe (usually) these are to debug the chip but maybe (never) they could be suitable to plug something into the chip (an usb input will be painless) so… Time to make some high resolution pics with clear light and find these chip datasheet…
I will come back! (I hope so :D)
Cheers.
Mutis, that is pretty damn impressive – hope the hack works with the Behringer device just as well as with the IO Dock. Give me an update when you get around to trying it.
I need a magnifying glass to check the name of the other chip, check the datasheet and find if there is anything related to usb to use it as receptor… I found old render pics from is202 which the usb port was labeled as from/to giving the impression being capable of it (and maybe implemented or planned and dropped to keep “made for iOS compliance)
So it is exciting but maybe a bit complex due to olimex cables and so… I need to get the whole thing working meanwhile I build my own midi mixer with regular 5 pin midi din ;P
Any help or suggestion is welcome. As soon as I can I will upload the related chip info and share my steps!
Cheers!
This is one example of these old render pics with label…
http://www.madridhifi.com/_published_files/_tiny/producto/10052618/BEHRINGER-ISTUDIO-IS202-T.jpg
;)
Help…
I have completed the mod. I pad charges fine. my Akai MPK25 lights up when I plug it into the new usb ports. However….I do not get any sound out of the IO and my powered speakers! When I unplug the mod and reattach the original cabling – I have sound again.
I have rechecked connections and they “seem” to be good.
One thing I noticed and it may not have anything to do with it… when I fired everything up without the +5v extra wire attached, the MPK25 still powered up even without it. However I attached it anyway as it seemed that was what the instructions suggested.
Any help is appreciated,
Shep
Hey Shep, sorry to hear that you’re running into trouble. Let’s start with the end: According to its tech specs, the MPK25 is perfectly happy with 100mA, i.e. it’s designed to work with a non-powered hub, which is why it’s powering up OK. (But needing the full 100mA which is why it’s probably not working without a hub on your Camera Connection Kit).
One thing I can think of is that you may have switched the USB data lines somewhere so that the bus is blocked. Easy to find out: The MPK25 is supposed to be class-compliant device, so once it’s plugged in, it should register as a MIDI source in any Virtual Midi compatible app you’re using. Loopy, Animoog, Sunrizer… you name it. Just have a look at the MIDI input slots.
If it registers – and you’re able actually to play music – I’m actually out of ideas other than trying to turn the iPad off and on again – it reloads the USB audio drivers after a couple of seconds. BUT: If you can’t find the MPK25 as a MIDI source I’d bet there’s something wrong with the USB connections – check all lines, look for switched data connections etc.
Hope that works.
Thank you for your response. I took a couple connections apart and reworked them. I am confident that I now have everything connected properly and nothing shorting out.
However…with everything apart and the “extra” 5v NOT connected – when I power up the DocK I get a red l.e.d. for a very short amount of time in the newly installed USB hub – then it goes out. And of course the MPK25 does not light up.
So, do I go ahead and connect the 5+ from the original IODock cable to give it power? I just want to make sure I do not short anything out. Remember, I am 99% sure all my connections are good. The only thing I have not yet done is install the 100uF/6.3 capacitor. It is on order as it was hard to find here in Phoenix AZ, USA.
Thanks,
Shep
The capacitor is not that important, really. Ex.: http://www.otemrellik.com/2013/05/i-added-an-usb-hub-to-my-io-dock/
Have you tried Midi? Have you tried registering another class-compliant device via USB, eg a keyboard? Have you tried another hub?
Well, I have finally succeeded!
This is what finally worked for me.
First I had a 7 port hub that I “knew” was class-compliant so I sued it for all my testing.
I made sure all my connections were good to eliminate any possibility of error there.
Since 2 of my 7 ports faced the opposite way I decided to use one of them for my connection to IO mainboard and simply soldered wire with heatshrink to add the USB plug. STILL DIDN”T WORK!
I finally took the +5v red wire from the cable coming off the iODock and went straight into the “ommited” pin in the iODock input USB (not the one that I added) and it worked!
I plan on doing a more thorough write-up on my “adventures” soon! Also: I mounted my new USB hub on the opposite side (right-hand side) because my USB mainboard was a little longer than Untgergeek’s and that side gave me a little more room. I had to lay my new USB board – slightly on top on the iODock’s mainboard with insulation between them.
I also slotted each USB opening separately rather than just one long cutout.
All-in-all it has turned out rather nicely!
IF you are interested in any pic’s – just let me know and I will supply them.
CORRECTION:
I have rebooted everything and I am back to where I started. iODock powers fine – MPK25 powers fine but everything defaults to iPad’s internal speakers and nothing from the iODock speaker outs.
Same as Stefan in the above post.
Shep
So come back again with some news…
After try with magnifying glass I could read (more or less) the “strange” (and little) chip near usb port.
It is a novoton 120LC (xxxx) 1BN arm chip which for our goal (and after meshing a bit with datasheet) seems a bit forward (but hey! Maybe one of you want to try it! I will link the sheets at finish) ;)
Then, we must return to the “brute force” approach… Hijack the connexion between the ipad and usb (the flat non user friendly olimex cable lol)
I will try take a look without broke nothing (because the ground is iron soldered to the xtal encapsulation, board and ipad side connector) and my earlier expierence with ipad dock suggest me that these ground are VERY important to keep right the ipad behaviour (and sync)
Things interesting about the flat cable:
It is 8 ways + ground (shield)
I didn’t see the label like the other connector/cable (which connects frontpanel controls to mainboard) but maybe these are down the cable (one side is unnacessible at first look)
So… Maybe its time to search a bit about olimex 8/9 ways cables and male/female connectors to perform a clean hack (and maybe a ready for noobs kit)?
We will see in the next episode!
Happy (hardware) hacking my friends!
Mutis
Links (for nerds, not really involved in straight forward hijack ipad usb connection…)
http://elcodis.com/parts/1925319/NUC120LC1BN_dt216927.html#datasheet
http://www.keil.com/dd/docs/datashts/nuvoton/nuc1xx/da00-numicronuc100f1.pdf (near 600 pages… Take your time)
http://download.nuvoton.com/NuvotonMOSS/DownloadService/Member/DocumentsInfo.aspx?tp_GUID=DA00-NUC120EN (service manual)
http://www.nuvoton.com/hq/enu/ProductAndSales/ProductLines/MicrocontrollerApplicationIC/ARMMicrocontroller/ARMCortexTMM0/Documents/NuMicro%20NUC100%20Series%20Technical%20Reference%20Manual%20EN.pdf
^^^^^^^^^^^^^^^^^^^^^^^^^^^^ Mmmm reference manual xD
Oooops… Untergeek could you cut these link (or encapsulate ut with [url][/url])?
The ipad fits the line as width and craps the page into stuart little font… Hahahaha!
Meanwhile I asked directly to behringer for schematics or so and…
Dear Mutis,
I understand you are simply trying to connect other controllers via USB MIDI?
“There is a type B USB MIDI input/output on the dock, and I understand that it works with class compliant devices already.
Please clarify if I don’t understand and I’ll do my best to get you an answer to your question. Thank you.”
“Yes! I want to connect something usb class compliant… Is the usb an input port for ipad or only output port to host?
Where it is explained because you could increase your sellings marketing this clear (believe me)!”
“Dear Mutis –
Yes, I have connected our class compliant Behringer UMA25S keyboard and to the USB MIDI port on the is202. It is an excellent option for sending MIDI via USB. Thank you for your interest.”
So, it seems is done, mates.
I don’t know if you saw my reply above – but I have completed the mod successfully! I want to thank you for all your help.
I did a write up on my website at http://www.churchnerd.org also giving you complete credit for this great hack.
I did a couple of things slightly different and gave links for the products I used here in the USA.
Shep
One word: awesome. Kudos for keeping on track, and for the rewrite – it’s way more useful than the original post.
You are welcome to use anything that I have written. I also have it in Word .doc file if you need it.
Good job Sheep!
For those who have the is202 out there… It seems that we don’t need the mod because it is integrated in the new dock!
Spread the word I will do the same with your work Shep!
Cheers
Shep (sorry about mispellimg before) it seems your direct link…
http://www.churchnerd.org/1085/
Is broken. Culd you fix it? I notice it after spreading it…
;(
On my end there are no numbers after the .org
It is just http://www.churchnerd.org – nothing after the .org.
CORRECTION: Sorry if you are looking for a direct link to the post only – it would be: http://www.churchnerd.org/alesis-io-dock/
Thanks for catching that!
Hi Untergeek, great article, thanks! I have one question: I would like to use the IODock without it’s power supply. Instead I would have a USB cable from a Mac connected to the USB hub in the iPad. That way the Mac would power both the IODock and my midi controller which is also connected to iPad’s USB hub. Would that kind of configuration work?
Haven’t tried actually, but I guess it wouldn’t work, for the simple reason that one USB bus is supposed to supply up to 500mA, and to charge the iPad and power the IO Dock you need over 2A. (The IO Dock’s power supply supplies 3A.)
But go ahead and try.
Folks, I have solved the problem of using my iPad Air with my Alesis IO Dock. You can read about it here: http://www.churchnerd.org/using-ipad-air-with-alesis-io-dock/
And I have added a YouTube video to explain the simplicity of the mod/conversion: http://www.youtube.com/watch?v=wuhTddM59_w
Thanks,
Shep
Hi, ‘Mutis’ mentions that with behringer istudio there is no need to mod the unit but I don’t think it’s possible to get midi working ,even with powered usb hub or feeding directly 5 volts to istudio and other midi interface.The usb midi port is designed for connecting to computer only…Hope I’m wrong and if anyone had success please report it here. Thanks!
Hi!
I mailed behringer and they said me it will possible but I never tried to plug anything class compliant at is202 port. I think it is not possible too due to the nature of endpoint conector and the apparition of newer docks with botth usbs (host and midi) separated like focusrite (only host, no midi din) or newcomming Griffin studio HD (midi din and host usb but no video output)
I finally buy all my gear with midi din and resolve my necessities but if you need info or so about modding the behringer I posted all the pics and documents here (and my flickr for the pics)
If you don’t need video output maybe te new griffin will be the best solution for you.
;)
Might be worth considering the Focusrite iDock – that is built to connect to class-compliant USB devices like keyboards by design.
Hi
Took me some googling to come up with the zwei answer being as I don’t speak german. ;) …So it appears no one has done this on the Behringer is202…but I am more than willing to give it a try and report back. I would appreciate a “coach in my corner” if you would be so kind as to e-mail me we can start to communicate and see if with your knowledge and my tenacity we can set the is202 free from the bondage of a one way USB port. Look forward to hearing from you. Tomco
Hi,
I posted all the info I have about the is202 internals. You may consider if you success you maybe sacrifice the usb syncronization from the dock to an external computer which in my case doesn’t worth the penny and I go for the “external usb host to midi route” with teensy and usb host shield (I have all the pieces minus the voltage regulator needed in teensy) I give you a link at finish.
In addition to that, the is202 is not so user friendly in the cable from the conector to the pcb (due to the extra controls in its front panel and due it has an olimex flat cable (expensive and a bit painful in the ass…)) but almost it has the pcb with the IC and connectors well labeled.
If none of these discorage you and still want to implement the usb hub, then I will be very glad to contribute but doing it at this webpage to help all the people (and give credit to untergeek as a pioneer) if you are agree. If we success it will be great make a new post with all the new info and how to.
;)
The link about teensy usb host (it needs the midi part but I have some help in these area too…)
https://www.pjrc.com/teensy/td_libs_USBHostShield.html
;)
Hi,
I bought a raspberry pi instead of teensy.Much easier (for me) and I have my own custom midi-patch-bay ;)
PS. I think it would be easier for someone to post ,if the anti-spam question was in English. I have to open google translate each time!
I’ll build a GTranslate into the code. Nah, good point. Will go and look for an alternative.
Pingback: Musique | Pearltrees
Hello, Why 2 usb normal A to B cables do not work connecting both thru an A to A usb female adapter in order to use the B connector to the external powered keyboard usb controller and the other B connector to the io dock? thank you.
Because you’d be needing a bus master? Go ahead, try.
Hello – does this hack now allow a MIDI controller to be connected as a USB device (ie,. not via the 5-pin). For example, something like the iRig Keys?
Thank you!
Hey David,
yes, absolutely. I used to have a QuNexus, which is functionally the same as your IRig Keys. The hack basically turns the IO Dock into a glorified version of Apple’s Camera Connection Kit. With charger. And a hub. And audio drivers. And MIDI.
Have you ever tried like this method described below?
Device needed:
1. http://www.amazon.com/Generic-Type-Female-Adapter-USB_A_F-USB_B_M/dp/B000AA2SMS
2. http://www.amazon.com/SANOXY-Cable-Converter-Keyboard-Window/dp/B0017H4EBG
3. The alesis io dock (or any ipad dock with midi female port)
Method is
1. Plug device no 1 to keyboard
2. Plug usb jack of device no 2 to device no 1
3. Plug midi jack device no 2 to io dock alesis
Is this works? If not, why?
Thanks, sorry my bad English, my native language is not english
Does this work with io dock II?
Never say never, but I fear it doesn’t.
Hi,
I tried this. Created two usb connectors (one small, one big), connected them to the board and plug on the io dock, but I get a message about USB Device Requires Too Much Power. I have a trust powered hub. Even if I connect the hub to a separate power source, I still get this message. The ipad loads, the hub’s lights are swiched on, weather I connect it to the external power source or not. The ipad sees the iodock. If I switch the cabels around (and i probably have the hub’s input connected to the board) I get no error message, but the use connections aren’t recognized either. Do you have any tips for me?
Thanks!
Hi! You all seem like my kind of people. I just fixed the charging on my iO Dock! Thanks so much!
I am curious about the motherboard itself though. While I had it apart I saw that there are FIVE button type, momentary switches on the motherboard that are not available to the end user (SW2,3,4,5,& 6. SW1 is the power switch). Why would they go to the trouble and expense of putting these on the board, then cover them up inside the case? Anyone know what they do? I can only assume they are there for use during assembly, QA testing, etc.
Also there are two extra connectors. One is obviously JTAG, probably for initial programming during fabrication. But the other 4-pin is a mystery. Anyone figure out what it is for?
Thanks!