Using an Arturia Beatstep (or something like it) to control the Matrix-1000

MIDI controllers

Hi, I just bought and upgrade a matrix 1000 to 1.20 , I saw your video on youtube where you control yours with a Beatstep Arturia.. I’d like to control mine with my key lab but I don’t know how to do that ! can you help me ?

I tried to build a template for the key lab with Arturia software (midi control center) but all button and fader on the keylab are midi cc , and if I assigne midi cc 21 for the cutoff it doesn’t work.. I don’t know how to make rnpn with Arturia controller..

If you did with the Beatstep I’m pretty sure it can work with key lab..

Clement

Hi Clement, I hope you don’t mind answering your mail in public. Using simple MIDI CCs won’t do the trick; you’ll have to use NRPN. (To be honest, I don’t know whether the Keylab can be programmed to send NRPN but like you, I am pretty confident.)

What is this NRPN thing after all?

You do know about MIDI CCs. This is one type of MIDI command where you send a controller number – 0 to 127 – followed by the value for that parameter. Quite a lot of synths assign a CC number to each and every parameter, for example the Roland JX8P synths, or my wonderful Creamware Pro-12 VA synth. The big advantage being that those synths do not only receive MIDI CC values, they also send them – when you change a parameter or switch to a different patch. A fader box attached to the synth can be made to show the settings for each individual parameters, like my Pro-12 panel for the iPad. Spoiler: The Matrix-1000 won’t do this.

The problem with MIDI CC: sometimes, 128 controllers won’t be enough, especially as quite a lot of them have pre-defined meanings. It is pretty crowded in CC-Land.

To overcome this, NPRN was defined – same idea as CC, different way to do it. The main difference being that there are not 128 possible controller numbers but 16,384 of them – and, by the way, they can send a much higher range of values; instead of 0-127, values from 0-16,383 are possible. But, another spoiler, not with the Matrix, and not with Arturia controllers, either.

You see, NRPN is not really a different MIDI command. It is a way to use the MIDI CC command to transmit a larger range of values. A full NRPN sequence is not one MIDI CC command, but four: using four designated CC controller numbers to send a more complex message.

  • CC 99 is the higher part of the NRPN controller number (the MSB).
  • CC 98 is the lower part of the NRPN controller number (the LSB).
  • CC 6 indicates the MSB part of the value: the coarse setting of the parameter.
  • CC 38 indicates the LSB part of the value: the fine setting of the parameter.

As MIDI can only transmit values from 0-127, the wider ranges for parameter numbers and values are transmitted in two parts.

How do I use this with the Matrix and Arturia?

The Matrix with V1.20 interprets NRPN as follows:

  • The NRPN controller number is the number of the parameter you wish to change. As Matrix parameter numbers are in the range of 0-98, this means that the first part of the message – CC 99, the higher part of the controller number – is always 0.
  • The NRPN value is transmitted as a coarse value – via the MSB of the value message.

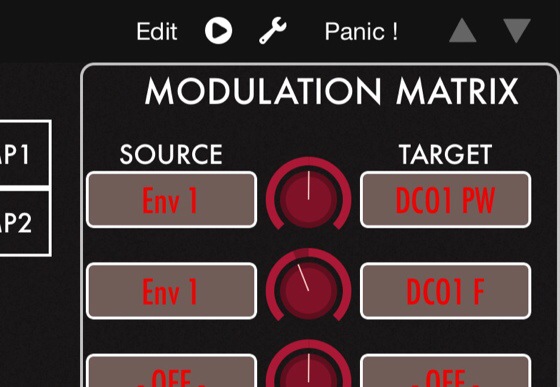
So to transmit the value for the DCO MIX parameter (#20), you’ll have to set the controls in Arturia’s MIDI Control Centre to:

(fixed a mixup here 07-Mar-18, thanks Jörg!)

  • BANK MSB -> 0
  • BANK LSB -> 20 (the number of the parameter)
  • DATA ENTRY -> COARSE (transmit the value in the MSB)

Arturia MIDI Control Center screenshot

If you managed to get a grip on NPRN, you may have noticed that Arturia is actually cheating: The NPRN transmission from the Beatstep does not make use of the full range possible. But at least the Matrix won’t make use of the higher resolution anyway.

More on the Matrix-1000 with V1.20 and NRPN here.

What makes synth keyboards turn yellow?

Spoiler: It may be the gig bags.

My magnificent Waldorf Blofeld has been shelved for a couple of weeks in the place where we usually jam – but as one of my fellow musicians had a broken finger, we could not make music together and I just left the Waldorf synth in that place, a basement belonging to a church. Then, on Saturday, we finally met again. I unpacked the Blofeld and was stunned to discover that it looked like this:

The keys had developed a slight yellow tint, well visible in contrast with the pearly-white Blofeld housing. A daylight view of the synth confirms this:

The tint is not very strong yet but it is plain ugly – and I know that even with a strong bleach agent and lots of sunlight, there is no guarantee to get them white again. Not mentioning the time it would take to take the keyboard apart. So I was shocked and hurt – and started looking for a culprit.

Good conditions?

The Blofeld is not the first synth that turns slightly yellow: A Korg R3 I once owned and sold to my friend, and which has been stored away in the basement room for months, has really, really yellow keys by now. So which conditions are responsible for making the keys (and the synths) that ugly?

To clear the most obvious suspicion: it has nothing to do with humidity. The cellar room in the church’s basement is next to the heating facility for the church, so it is dry, warm, and sufficiently aired. But there is another factor: Both synths had been stored in gig bags.

Soft bags like the one for my Blofeld are cheap, lightweight, and available in all possible sizes – but my theory is that these gig bags air a chemical agent that slowly tints the plastic keys. A likely contender: a brominated flame retardant. Cheap plastic textiles like the ones used for those gig bags are required to be made from flame-retardant material, so the agent is there, maybe something like the common TBPPA that is supposed to be harmless in comparison to other flame retardants. We know that they diffuse into the air – almost every human in the Western world contains traces of bromide from flame retardant. What that will do to our health is another rather unsettling issue, but I am pretty sure that it makes my synths ugly.

What is there to do?

Apart from the Blofeld and the Korg R3, there are a couple more synths in the basement room. My friend keeps his master keyboards in plastic bags, and they have not been affected by the yellowing disease – so if you are about to store synths, it may be a good idea to put them into a closed trash bag before putting them into the gig bag. I also noted that another keyboard in another gig bag is not affected – maybe due to another flaming retardant used, but more likely because I never closed that gig bag, so the chemicals just diffused into the air (and into our lungs) rather than into the keys.

I will have to write to Thomann about this.

An Unreachable Quantum of Waldorf

Yes, it’s there. The first ever Waldorf Quantum can be admired at Musikmesse Frankfurt. Admired from a distance, that is, because they put the prototype under cover. „It’s our only one, and it still has to reach Superbooth, so we are a bit reluctant to have end-users play it“, the developers told me when I asked whether I’d be allowed to touch it.

Waldorf Quantum prototype, spotted at Musikmesse Frankfurt 2017

So what can you gather from some minutes of unabashed gloating in front of a Plexiglas shrine, and a few friendly words with the developers, that hasn’t been said yet? (Sort-of-super-Wave with granular synthesis and resonator banks on top of the standard wavetables, 8 voices, analog filters, destined to be ready in time to be bought for Christmas, for something around $3000, etc.?)
Here are some observations:
Weiterlesen

Niederlagen – auf dem Weg zum Technikfriedhof

Es ist ein schönes Gefühl, Dinge reparieren und instand halten zu können. Der Technik nicht ausgeliefert zu sein. Funktion möglich zu machen.

Es ist ein nicht so schönes Gefühl, durch Blödheit oder Ungeschicklichkeit die eigenen Erfolge sabotiert zu haben. Und wo ich gerade am Aufarbeiten alter Schludrigkeiten bin, kann ich auch gleich das festhalten: Manchmal baut man, wenn man baut, Mist.

Fall 1: der Beamer.

Bei eBay als defekt ersteigert, weil ich aufgrund der Fehlerbeschreibung die Vermutung hatte, da wäre noch was zu machen. Tatsächlich: Bald hatte ich heraus, dass der Projektor an sich völlig intakt war, aber unter einem schlecht montierten Gehäuseschalter litt – so ein Schalter, der beim Öffnen des Gehäuses die Stromzufuhr unterbrechen soll; er unterbrach sie auch gerne einfach so. Über meine Entdeckung war ich so euphorisch, dass ich unvorsichtig und ungeschickt geworden bin und mit dem Schraubenzieher im geöffneten Gerät einen Kurzschluss verursacht habe.

Drei Dinge passierten:

  1. Es knallte gewaltig.
  2. Die Sicherung flog raus und ich saß im Dunkeln.
  3. Vor Schreck riss ich meinen Arm zurück und dabei die Bedienplatine samt Stecker von der Platine.

Natürlich habe ich versucht, das wieder hinzubiegen bzw. zu -löten, aber ohne Erfolg. Tja, einige Sekunden lang hatte ich für praktisch überhaupt kein Geld einen eigenen Beamer.

Fall 2: die Büro-Kaffeemaschine.

Ach, meine gute, alte Saeco Vienna. Ein Sorgenkind von Anfang an, und dann: treu, brav, verlässlich. Bewährte Koffeinspenderin für einen guten Teil des Büros, und bei kleineren Wehwehchen mit etwas Liebe immer wieder zur Arbeit zu bewegen. Da sie das zwanzigste Lebensjahr schon hinter sich haben dürfte und sich zumindest in den letzten Jahren bestimmt nicht gelangweilt hat, ist das schon eine Lebensleistung. Und doch…

…plötzlich, nur noch Tröpfchen statt eines Kaffeestrahls. Wohl meinende Kollegen rissen laue Witze über Prostataprobleme bei älteren Herrschaften, kurz: es war wieder Zeit. Einen Sonntagnachmittag lang den Küchentisch blockiert, den Fehler gesucht und bald gefunden – wie beim allerersten Mal war es ein Krümel Kaffee, der den Durchflussmesser verstopfte. Schnell beseitigt und gleich noch an die Große Inspektion gemacht, also gereinigt, das Mahlwerk demontiert, Dichtungen ersetzt, zusammengebaut, ausprobiert, gemerkt, dass eine Dichtung fehlte, die Sauerei weggewischt, alles wieder aufgemacht, Dichtung umgesetzt, zusammengebaut, läuft. Super!

Also schnell aus der Wohnung schaffen, damit sie aus dem Weg ist.

Der Denkfehler wurde mir klar, als ich die Maschine am nächsten Morgen auf Arbeit aus dem Auto holte: Es ist kalt, auch in Frankfurt friert es nachts. Das Restwasser in der Maschine war auch gefroren. Und damit sind einige Dichtungen und Schläuche hinüber. Welche, das will ich schon gar nicht mehr erkunden – vermutlich die Boilerdichtung, für die man wirklich, wirklich alles auseinandernehmen muss.

Kofferrauminhalt

Links die erfrorene Kaffeemaschine, rechts der erschlagene Beamer. Und ein Paar alte Autoboxen

Das hier ist also nur noch eine Kofferraumladung Elektroschrott (genauer gesagt: ich habe beschlossen, dass es nur noch Elektroschrott ist), und geht demnächst zum Recyclinghof.

Aufgegeben? Ja.

Hätte ich die Reparaturkandidaten nicht noch einmal reparieren können? Vielleicht. Aber so wie mich der Beamer seit Monaten vorwurfsvoll anguckt, hätte mich auch die Kaffeemaschine vielleicht jahrelang angeguckt, bis ich irgendwann dann doch den Mut und die Zeit gefunden hätte, einen Tag für einen weiteren Reparaturversuch zu opfern. Nenn mich schwach: Ich habe das nicht mehr ausgehalten.

Ärzte, sagt man, können ihre Fehler auf dem Friedhof besuchen. Ich habe meinen zumindest hier im Blog ein kleines Denkmal gesetzt.

Geekgeschenk mit WAF!

Über den WAF, den „Women’s Acceptance Factor“, habe ich mich schon öfter ausgelassen – eine Umschreibung für die unbestreitbare Tatsache, dass sich tolle Technik für normale Erwachsene nicht immer ganz so toll darstellt und anfühlt wie für den Normalnerd. Um so stolzer bin ich auf dieses leicht nerdige Geschenk: 

Ladestation, weißes Kästchen mit drei Handy-Ruhebänken und Playmobil-Figuren, die die Ladekabel halten
In diesem kleinen Kästchen befindet sich ein Ladegerät, das parallel zwei Android- und iOS-Geräte laden kann und dabei allen Kabelsalat vor den Bewohnern der Wohnung versteckt. (Das Kabel, das an der Seite herausragt, ist nur temporär eingesteckt, um noch einen alten iPod laden zu können.

Wahnsinn: Dieser Handwerker hat Android- UND iOS-Ladekabel dabei. Und muss nicht nochmal zurück in die Werkstatt, um den fehlenden Adapter zu holen.


Die Auswahl der Figuren ist ein wenig zufällig. Ursprünglich wollte ich mal eine gemischt geschlechtliche YMCA-Truppe zum Ladedienst antreten lassen, aber dann fand ich tatsächlich keinen Indianer und hatte die Polizistin verschlampt. Das schnell noch nachgekaufte Überraschungsfigurentütchen enthielt den Magier – passt ja auch ganz gut. 

Die Micro-USB-Ladekabel habe ich mit einem Aufroller eingebaut, der ein ungenutztes Kabel wieder ins Kästchen zurückzieht, für die iOS-Kabel habe ich mir das gespart – die sind ohnehin anfällig genug. Die Bänkchen sind kleine gipserne Kärtchenhalter aus dem Dekoshop, mit Silberlack angesprüht. Wirkt römisch. 

So sieht’s von innen aus: 


Tatsächlich kam das Geschenk gut an und wird seit geraumer Zeit freudig genutzt. Kleiner Nachteil: Die Playmobil-Figuren ziehen die nicht ganz so erwachsenen Frauen in unserer Familie geradezu magisch an – deshalb ist der Laptop festgeklebt, und manchmal muss ich der Kleinsten den Kopfhörer für das City-Girl wieder abjagen.

Tough Love: 5 Gründe, warum wir Retro lieben

Roland JX8P Synthesizer in, sagen wir, leicht angefasstem Zustand

Neulich habe ich mir einen 30 Jahre alten Synthesizer gekauft. Eine Maschine, die auch ohne die Kratzer nicht besonders hübsch wäre und längst von Software für ein paar Euro rechts überholt wird. Eigentlich wollte ich sie nicht einmal, und Platz und Zeit habe ich auch nicht dafür. Aber was willst du tun, wenn es Liebe ist. Liebe? Moment mal…
Crosspost zum Super-Retro-WMFRA #67 am 8.12. – weiter lesen auf wmfra.de.

Keytek CTS-2000: Fondly remembering a truly horrible synth

In the late 80s, I decided to spend serious money on my first serious synthesizer. Unfortunately, I did not have any money, so I started scouting the ads and mailing lists of lot sellers. There was this one company that, obviously, had good connections to the dying Italian synth industry, and I clearly remember the magnificent Elka Synthex on top of one of those leaflets, a true monster of an analog synth, somewhere on the path between „hopelessly old-fashioned“ and „awed classic“, on sale for just over 3000 Deutsche Mark, if I remember it correctly.
I ended up spending 1500 Marks on another Italian Synth: The Keytek CTS-2000 from Siel, later bought by Gibson, even later bought by Roland just to close them down. [Update, 28-May-17: Interesting additional info about what became of Siel after the Keytek is to be found in the comment by microbug.]

1987 ad for the Keytek CTS-2000

1987 ad for the Keytek CTS-2000 via RetroSynthAds – linked

From today’s perspective, this machine was not much of an improvement over my previous means of sound generation, the Casio CZ-101, a digital synth with its very own character. But then, the CZ seemed unbearably cheap and nonsensical to me, with its small keyboard, and its four-voice limit. The CTS-2000, on the other hand, was an eight-voice affair with a proper, velocity-sensitive keyboard. And the technology! Sampled waves! Dynamic wave manipulation! Multitimbrality! Sliders for real-time parameter control! Six-stage envelope generators! And! Analog!! Filters!!!

A great concept. There was, to quote another classic from the era, just one tiny little flaw.


There were a few questionable decisions made in the design, as you can read here. It also lacked the processing power to do what it tried to achieve; its TMS-7002 brain was too weak. But the worst thing was: The synth sounded horrible. What I had hoped for was classic analog punch with a digital, modern twist. What I got was a dull third-rate ROMpler. One of the best sounds was no analog pad but a sampled ripoff of a DX-7 slap bass sound. Despite its analog filters, the sounds were thin and harsh, and even the metallic sounds did not shine but came across flat and dull. All high frequencies seemed to be missing.

Dull by design – the central flaw

I tried to make up for the lack of overtones by buying a small enhancer, a device meant to generating additional overtones, and it sort of helped with the piano sounds. But the overall sound remained disappointing, and later, I realised what the problem was: the output circuitry dulled down the sound. A crude and uninteresting low-pass filter removed all signs of life from the signal.

Thinking about it, this is due to the limited technology. When you work with samples, you get quantization noise – the difference between the original wave and the wave generated with, say, an 8-bit resolution. [EDIT: Thanks to a comment by Mikkel Karlsen I learned that the Keytek was built around two SGS M114A chips, digital oscillators based on wavetable ROM, and I suspect that they were used with the lowest possible resolutions of 16 steps per wave cycle, so you would actually get Q-noise three octaves above the pitch frequency of the wave.] Quantisation noise is noise with the frequency of the sample playback, meaning that with lower sampling frequencies, say, around 10kHz, you will get an audible hiss in the signal. But the feeble hardware is incapable of high sampling frequencies. Think of it as a permant, built-in bitcrusher.

The designer seem to have feared that noise, so they added the low-pass filter to the outputs. I actually quite liked it, so I removed a capacitor from the circuit and killed the filter. It sounded a lot better to me after that.

Moving on

Still, the Keytek remained an uninspiring machine – and I was really glad to sell it and to move on to a really decent FM synth, the Casio VZ-1. (You see, I’ve got a soft spot for underdogs.) And all the analog warmth I’d ever need soon came from my Matrix-1000 – the one that only recently has undergone brain surgery.

I had all but forgotten the Keytek, but rediscovered it while doing a lot of research on the Matrix 1000’s peers, the generation eventually killed of by the DX-7 and the D-50: 8-bit machines with an analog heart like the Polysix or the Elka EK-22 (another machine that I could have ended up with, and that would have made me much, much happier). These machines keep intriguing me, and although there is quite a good argument to be made that they were closer to what we search in creating sounds – I urge you to read Bob Weigel’s thoughts on the age of Analog and how it ended – I guess it’s just nostalgia, a longing for the time when the world was great and the technology was a marvel.

So I’m remembering the Keytek with fondness and a lot of sympathy for its engineers. I would never take it back, though – even nostalgia has its undisputable limits.

I’ve put my modded IO Dock on eBay!

It’s the first ever IO Dock outside Alesis‘ labs to feature a USB hub, it’s the most successful project in this blog, and I am selling it. 20140523-105055-39055060.jpg

It was a simple hack on a crazy notion, and I’m really happy how it all turned out, getting noted by Discchord and Synthopia and others. More importantly, it’s a simple solution for a real problem, and it just works.

I’m also a lot more confident that it’s a good hack: The modified IO Dock has been in use at home and in the band for over a year, and the hack has been successfully replicated by some very smart hackers – over at Churchnerd’s blog you’ll not only find a description how to do it that is way better than mine, he also found a simple and elegant way to make the modded dock work with the iPad Air.

So why am I selling? I’ve got a good reason: Money. :) Apart from that, I am using an iPad Air now and switched over to another interface – a third-hand Novation X-Station keyboard/synth/fx combi with class-compliant USB Midi and Audio in/out. Best solution in the practice room for the time being, and if I’m getting a good price on my IO Dock, I might go out and get a Focusrite iTrack Dock to use at home.

However, I encourage you to try the hack for yourself, and I am confident that it will work with the new, lightning connector enabled, IO Dock 2. (Update: unfortunately, it doesn’t.)

A couple of things I have learned:

  • Some people are really scared by the bullshit warnings that advise you not to open the housing.
  • Anybody who can solder a cable can do it.
  • The hub matters. I was lucky to pick an active hub that works in my setup, a Belkin F5U404. If the hack does not work, and you have excluded switched in/out ports and messed-up USB connections as the cause, you may try another powered hub.
  • Use connectors, don’t solder it into the IO Dock – although you need 2mm pinstripe plugs/sockets like these that may be a bit hard to find, it is worth the effort: you’ll be able to test and reverse the hack.
  • Lab-test first. Dremel later. Before soldering or dremeling anything in the Dock, start with a simple workbench test – open the Dock, unplug the connector for the iPad, connect it to the hub with the modified cables you’ve made.
  • If you overload the IO Dock by drawing too much USB current, it just shuts down. So far, no harm has been done, still I think it’s a good idea to be careful and never connect more than one 500mA device.
  • When you are hacking the IO Dock anyway, you might think about adding a power-on LED connected to the hub’s 5V supply – I always regretted not having done this.

One thing left to do: Many, many thanks for all the feedback, the ideas and the improvement. It made it all worth while. Whatever the turnout of my auction is.

Matrix Modulation control included: iPad editor for the Oberheim Matrix-6/1000

Remember what I wrote about my attempt to build an iPad editor for my vintage Matrix-1000 analog synth with TB Midi Stuff? That it’s a pity that, due to the rather eccentric MIDI implementation of the Oberheim machine, I couldn’t build a controller for the modulation matrix? Tell you what: it works now.
20140430-235200.jpg

TB Midi Stuff – which is an absolutely great universal kit for building MIDI controllers, looking great and much cheaper than Lemur – has recently gained a feature that allows to send three-variable Sysex commands. And this is important – let me tell you why. (BTW, for those who can’t wait: Download links to the Matrix-1000 editor panels can be found in the TMBS forum. [here – v1.03, „Open with…“ TBMS on the iPad])

Update, January 2022: TB Midi Stuff has been pretty much abandonware for years now; although you can still use – and buy – it, it is more and more at odds with newer iOS versions. Use at your own risk. And you might try badgering Fabien Manchec, the developer, about his promise of an update from mid-2020, but be kind – solo developers don’t make a fortune on those niche apps.

Let me explain the problem, and how to solve it with TBMS.

Unfortunately, this won’t work with Matrix-6s – they do not understand the sysex commands needed to program the mod matrix directly.

The Oberheim’s matrix control – one command, three parameters

As I’ve written before, the Oberheim Matrix-1000 has a couple of quirks and issues, especially concerning the modulation matrix, the analog synth’s strongest asset. Almost any other sound parameter within this synth can be controlled individually with a tailored MIDI Sysex message (something like: F0 10 06 06 1A xx F7, translating as „Listen synth, control coming up, setting vcf, to VALUE, thatsit“); the matrix modulation paths are set by a command sequence like this: F0 10 06 0B 01 xx yy zz F7, translating to „Listen synth, modulation coming up, setting modulation path 1 now, FROM, BY, TO, thatsit.“ What this means is: If you want to have full control over the modulation matrix, you have to be able to craft a Sysex message with at least three parameters.)

TBMS from version 2.2.4 on has a feature to achieve this: Masked variables – variables where you can set the bits you want to control. They can be up to 21 bits large – equalling three 7-bit MIDI values. So instead of sending three independent values, you tell TBMS how to craft a 21-bit variable containing the three parameters – and send this.

Step by step:

    • Define a global variable by entering Edit mode, selecting Page Settings in the upper right corner, scrolling down all the way, and adding a user variable. I’ve called it „mod0“, for modulation path 0; I’ve made it an internal variable, don’t worry about assigning it a range and max and min values for now.
    • Now, define a controller for the third of my three parameters – MIDI parameters are 7 bit only, e.g. between 0 and 127, equalling a hexadecimal value of 7F. Hexadecimal numbers are what you use in Sysex and masked variables, so what you do is add a Variable Message, select „Set Variable with Mask“, and set the mask to 7F. (My values are 0-32, so no setting the „Signed“ switch for this parameter. Remember to set the „Minimum Value“ and „Maximum Value“ to 0 and 20.)
    • Define a controller for the middle parameter – just as with the one above, only with a slight modification: Set the mask to 3F80. — Why is that? It’s 7F shifted left by 7 bits, and as you remember, parameters in MIDI are 7 bits. One noteworthy thing about the middle parameter: In my case, it takes values between -63 and +63, so I’ve set the „Signed“ switch here and set the „Minimum“ and „Maximum“ sliders to -63 and +63.
    • Only the most significant parameter missing now: Add another control for the first parameter, shift the mask by another 7 bit, and get 1FC000. Set Signed, Minimum and Maximum as desired (I used a 0-20 range here.)
    • Go back to Edit mode, call up the Page Settings, scroll down to your user variable, and add a MIDI message to it: Make it a Sysex message. Set Variable Size to three-byte and – this is important – Message Format to Linear (Little Endian). „Little Endian“ means that the lower values are sent first; as we’ve made our first controller control the lower 7 bits, this is just right. Set a Sysex message, which in my case is „(F0)10060Bxx(F7)“.

I guess there are not that many people who have followed my that far – but if you have, you may have noticed that the variable is supposed to transmit 3*7=21 bits of information, resulting in an integer range of 0 to 2,097,151. You can actually set that value in the Sysex range control setting,.

So whenever you tweak the controls for Matrix modulation path 0, TBMS constructs a three-byte, 21-bit message, which it then sends as part of a Sysex control message.

Enjoy!

The most recent version can be found in the TBMS forum. Dropbox link to V0.4 here and here. Please remember that there are two nasty bugs in the Matrix-1000 firmware – you cannot control ENV2->VCA and ENV1 Sustain via TBMS in consequence -, and that the editor only sends Sysex, it does not receive and interpret it.