Building my own wheels for the Launchpad Pro – once again, with style.
Two weeks ago, I started a little sunday afternoon project, sucessfully building my first own MIDI controller – a pitch bend/mod wheel/midi merge device to serve as a companion to my new Launchpad Pro. Using an Arduino, a prototyping board by SparkFun, and community-made code, I succeeded with surprisingly little effort – the most time-consuming part was finding and fixing the errors I had clumsily soldered into my pathetic excuse for a MIDI interface. But it worked!
 As they say, the worst thing that can happen is that you succeed. The quick and easy success made me hungry for more – I started a MIDIfication project for my JEN SX-1000 monophonic synth, based on a Teensy, another microcontroller board that can be used within the Arduino development eco-system but is much better suited to MIDI/USB applications.
V2.0: A Teensy-based MIDI controller
This is actually a side project to that. I looked at my self-made controller and noticed that it is usable but not very playable – I wanted real wheels for the Launchpad, not sliders. So I decided to redo a V2.0 of the controller, based on the Teensy.
The task was: Get controller wheels, wire them to a Teensy, provide it with MIDI In/Out and USB, wire it up to a small display and a couple of buttons for fun, adapt the software, and build it into a housing. All in all, it took about two working days to complete – a lot more than I (and my family) was originally prepared to sacrifice. But there you go – nothing as dangerous as success.
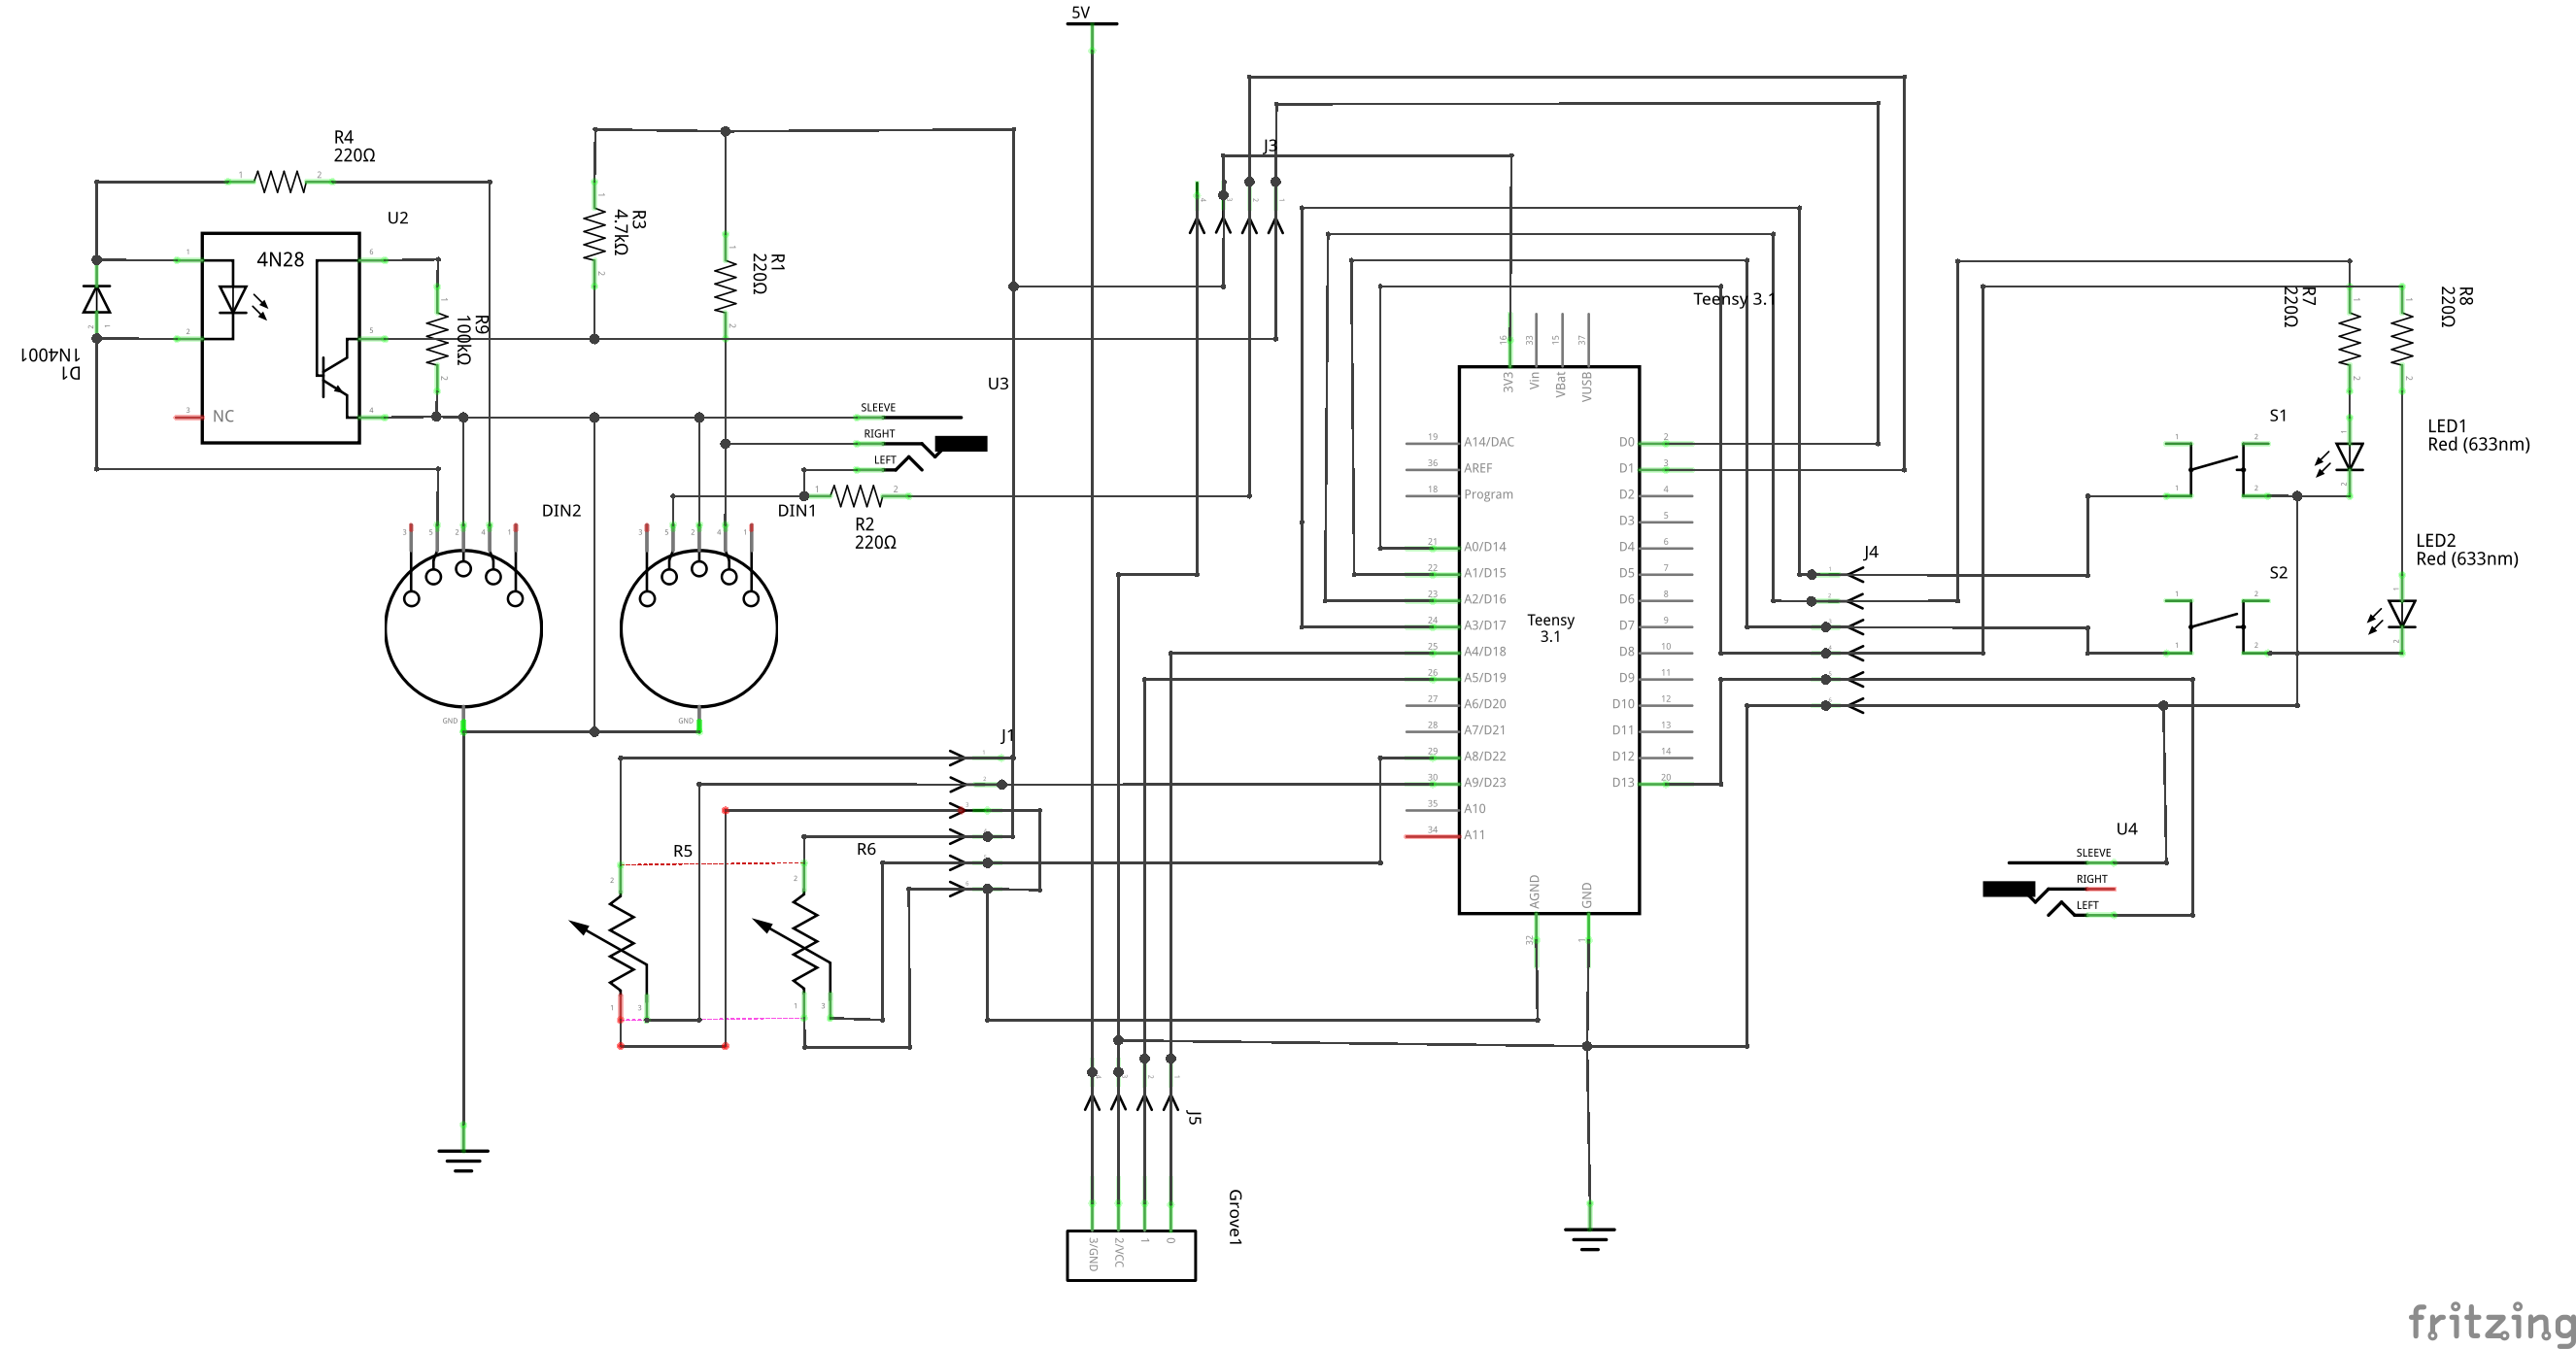
You can find the code, and the schematic, in this Github repository.
It’s surprisingly hard to get Pitch Bend/Mod wheels
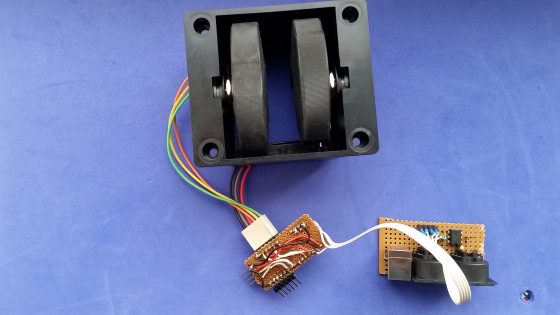
My first discovery was that wheels are surprisingly hard to get. Although I looked hard, I found no shop where you can order them as DIY parts, apart from Doepfer who are running out of stock. You can order spare parts for existing synths, but they are expensive and won’t fit well. In the end, I got an old wheel box from eBay, just like the ones Doepfer no longer has on stock but seemingly from an old Wersi organ. (Hang on: An organ – with mod wheels??? Never mind.)
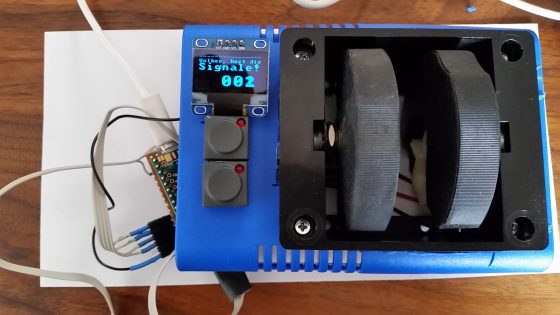
This wheelbox has found a home in a rather unassuming blue housing for now, together with the microcontroller, the MIDI board, two buttons with LEDs, and an OLED display.
Teensy 3.2, its contacts, and its levels
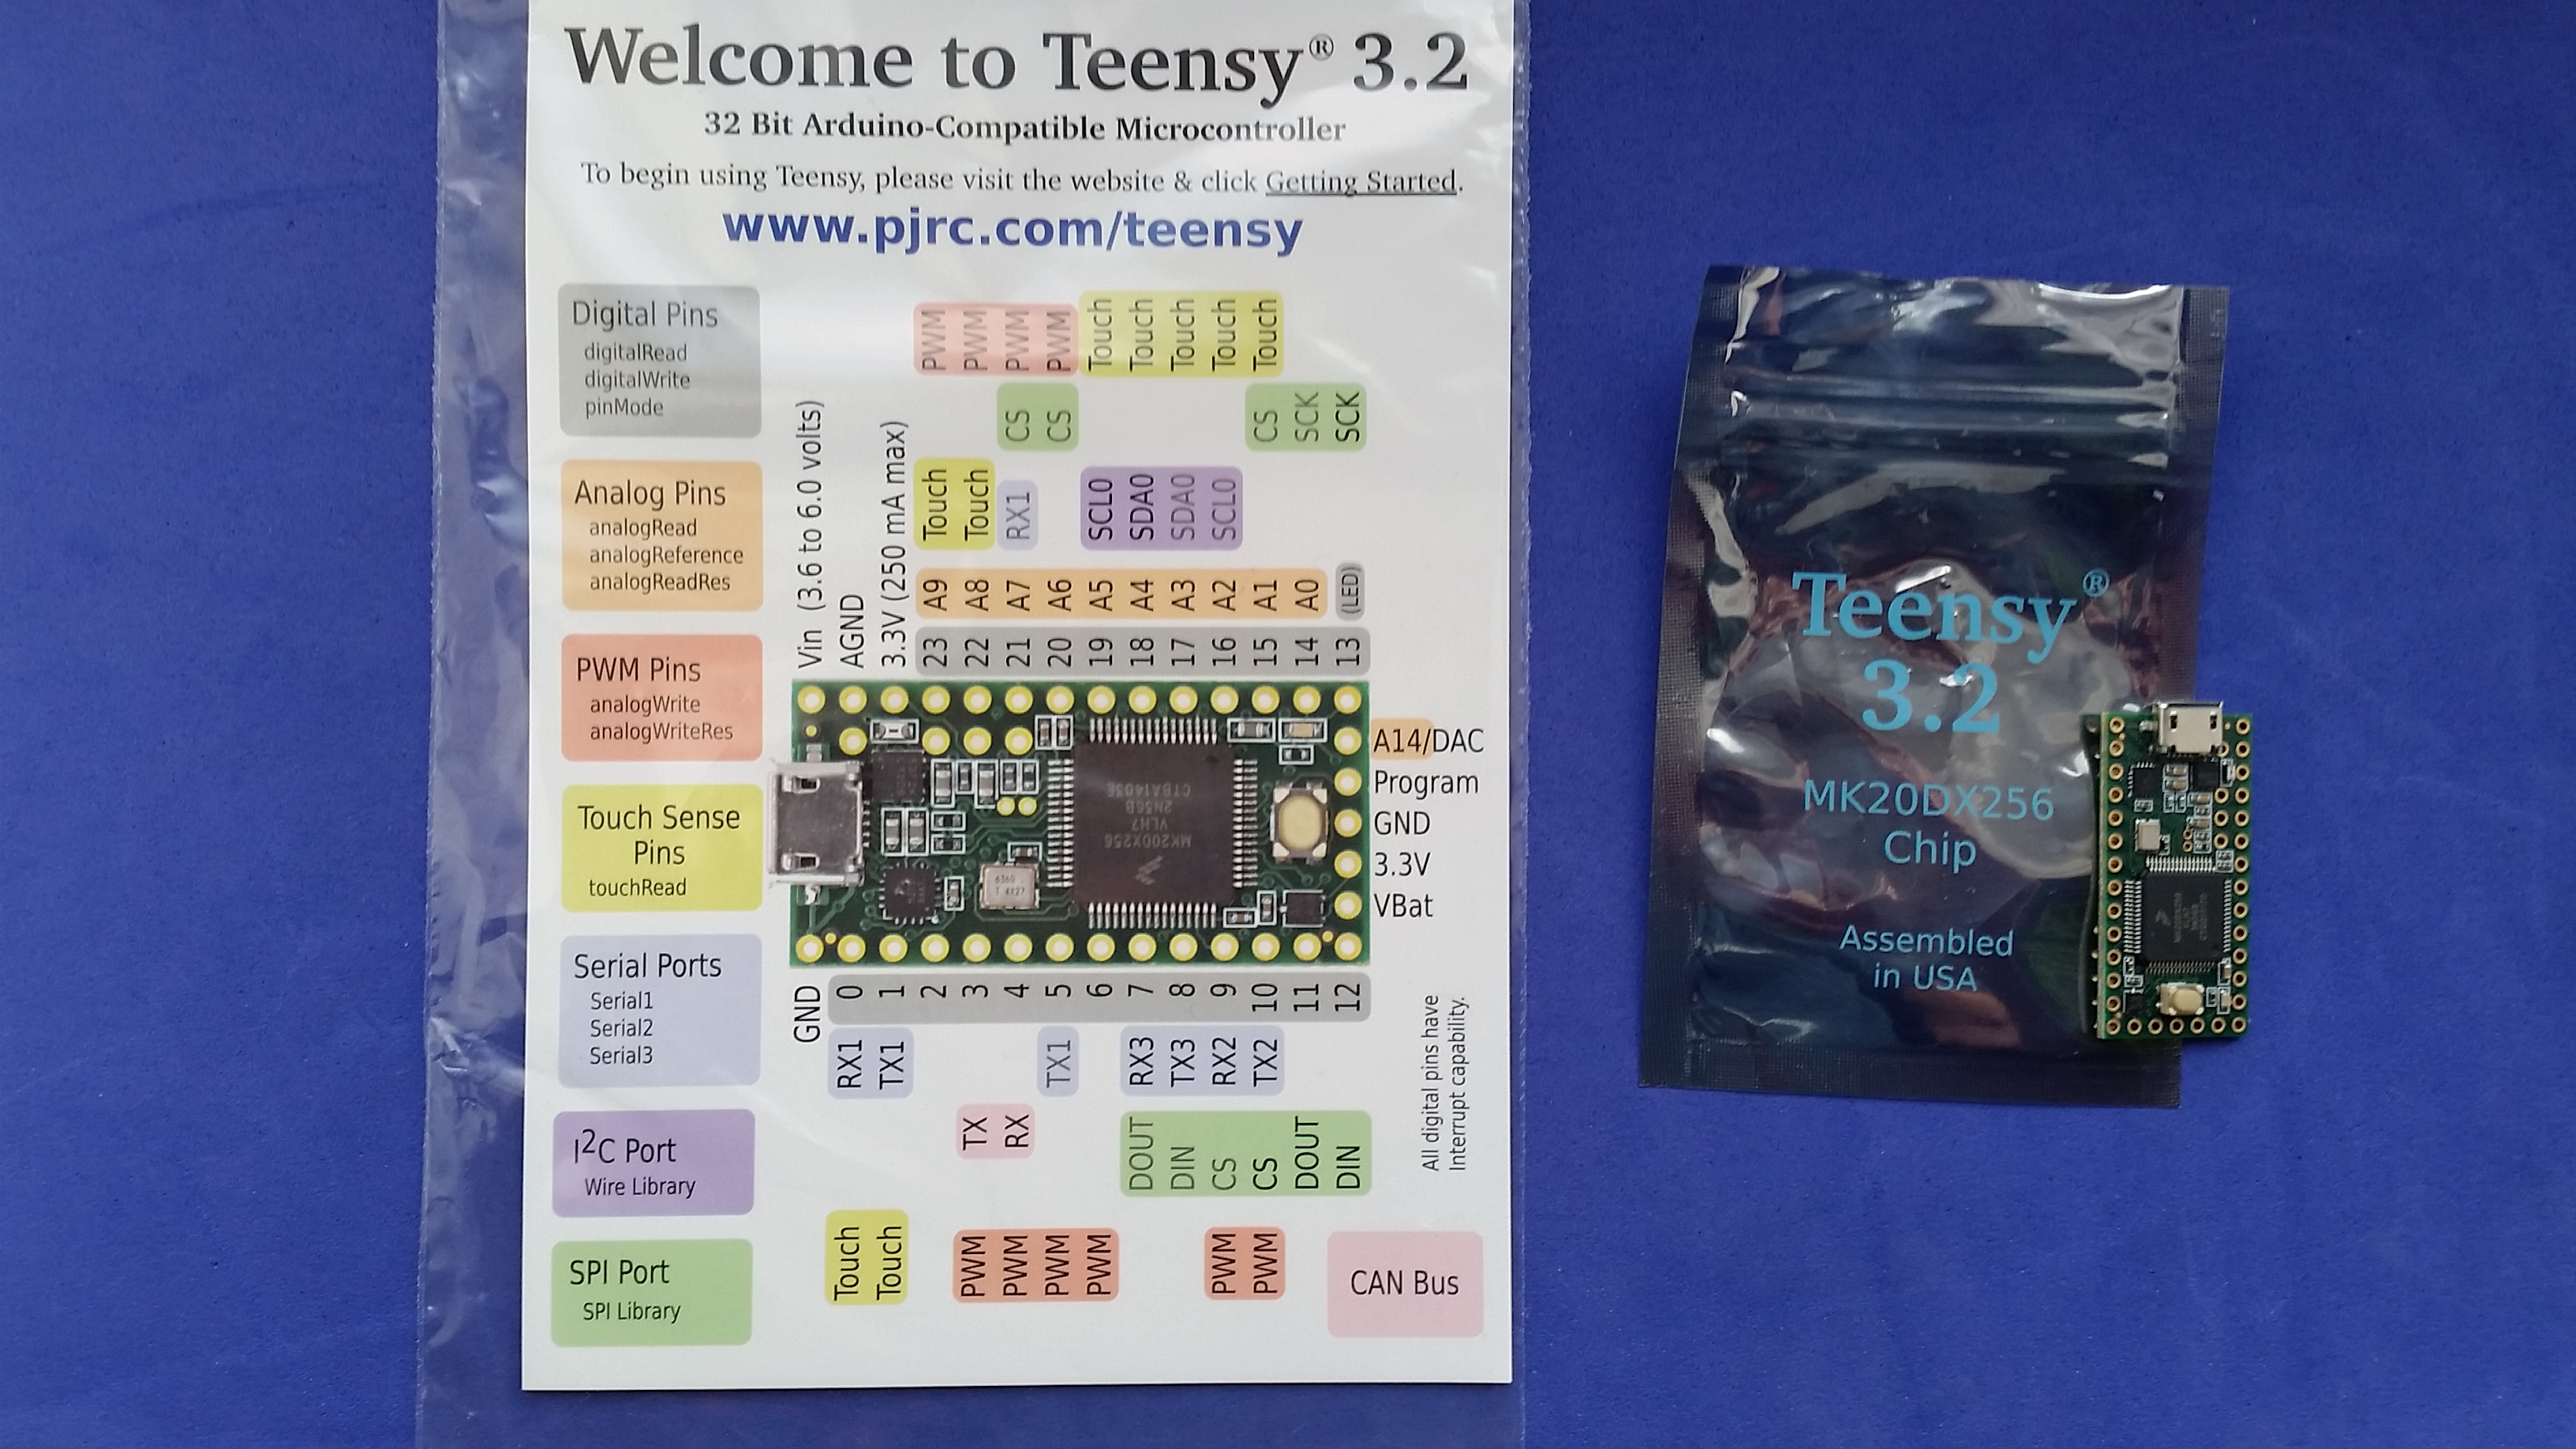 The second issue was that the chip on the Teensy works with a 3.3V supply voltage rather than with the 5V I was used to. This is no big issue for this project, although it will be for the JEN SX-1000 project mentioned above.
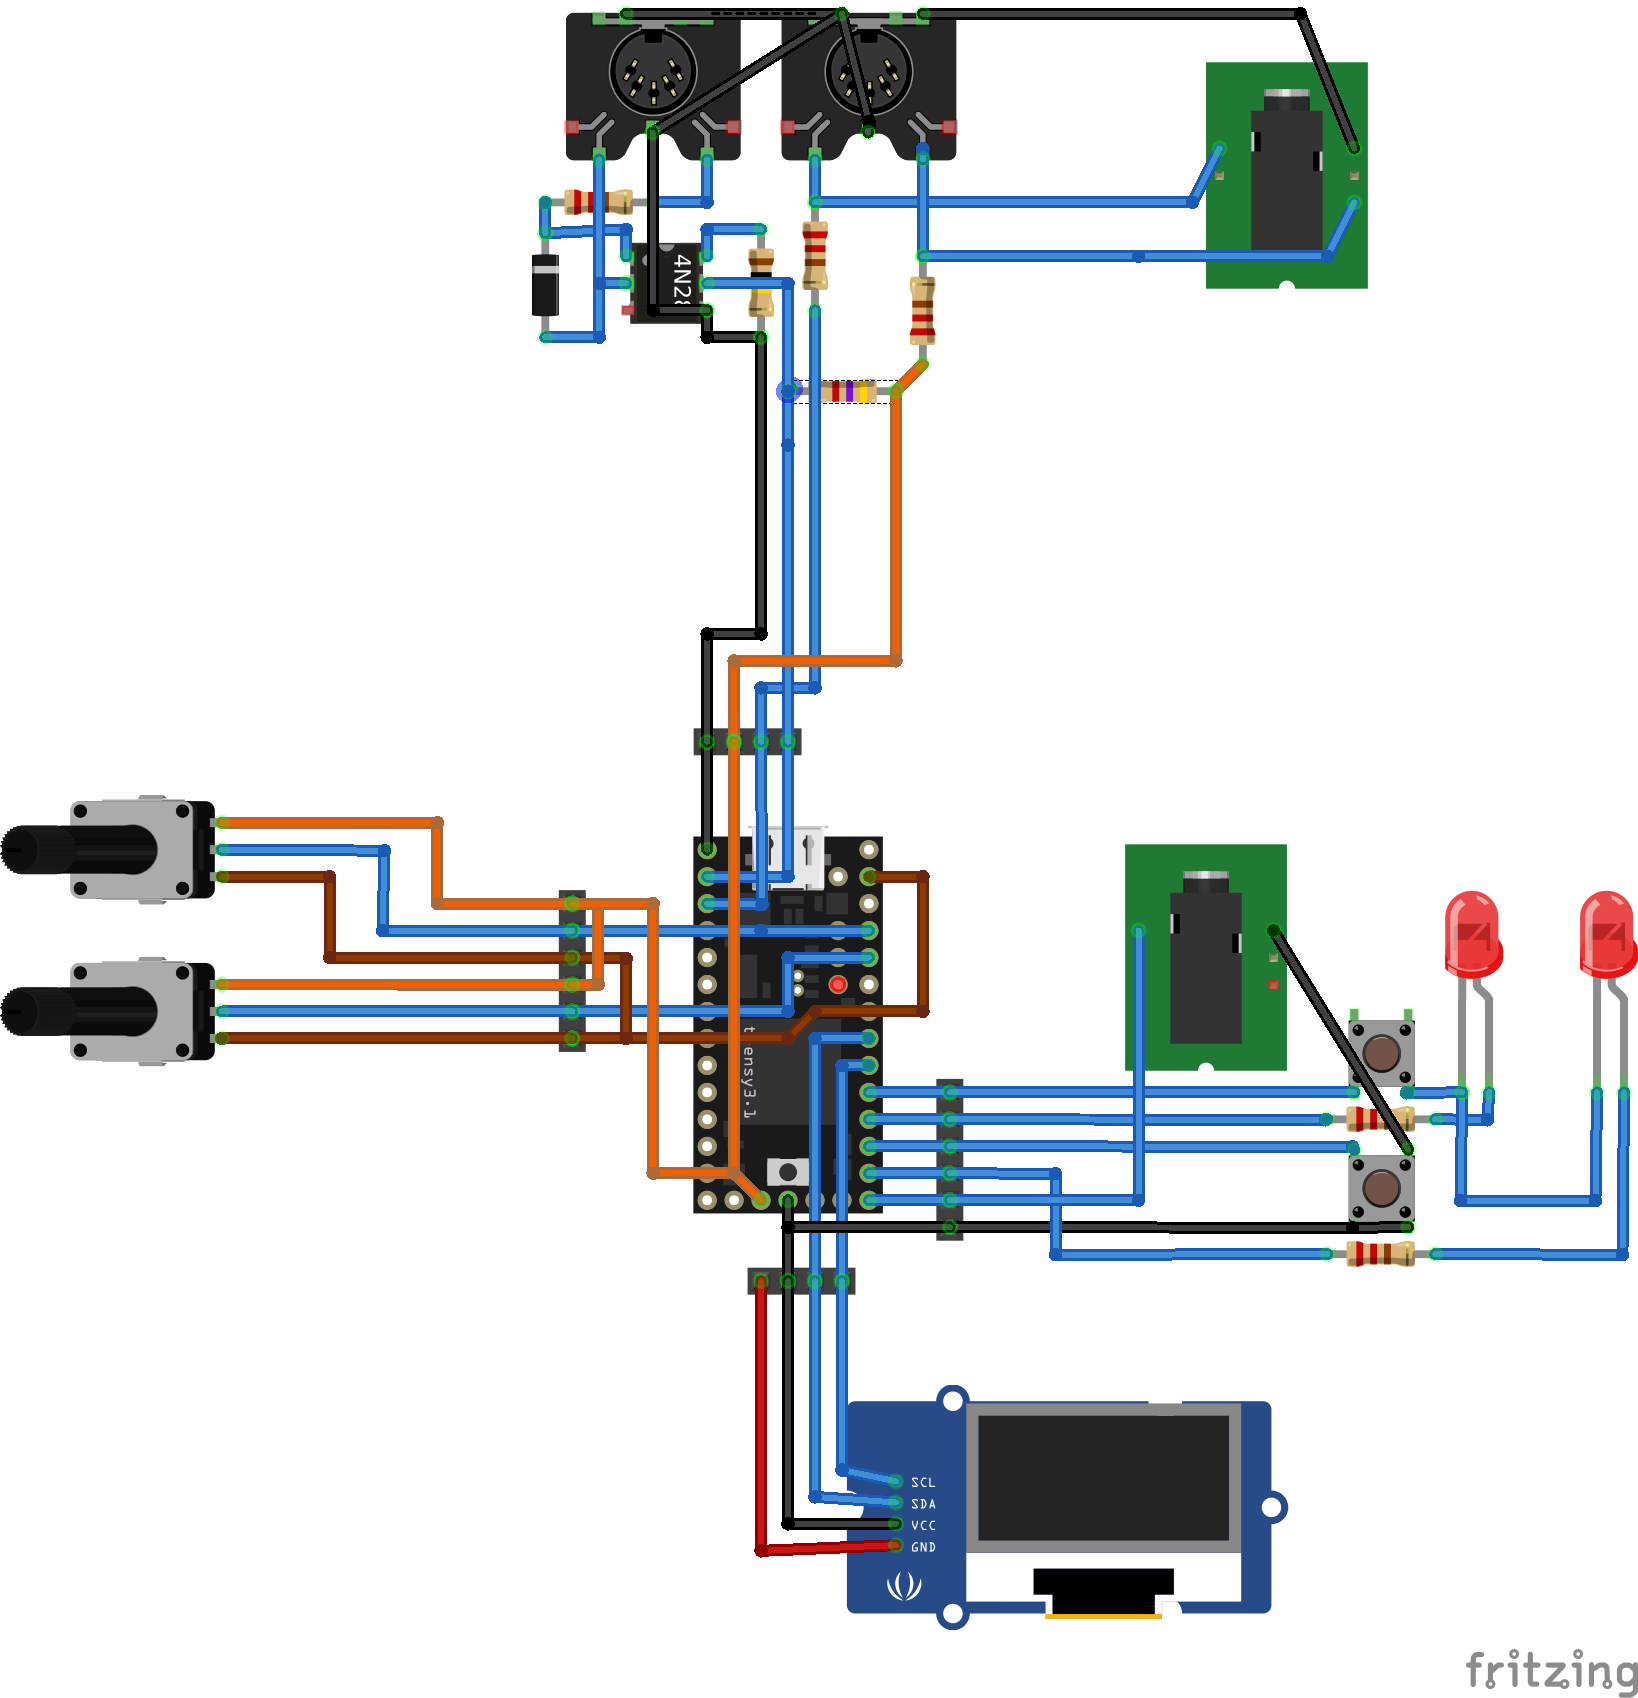
To interface the Teensy, I soldered it to a breadboard with pinstripe connectors, quite simple and with much less wiring as it would seem from the breadboard wiring schematic above. The OLED display takes 5V supply voltage, wheel pots and MIDI interface circuitry are supplied with 3.3V. The MIDI interface is built to a small daughter board.
The MIDI board
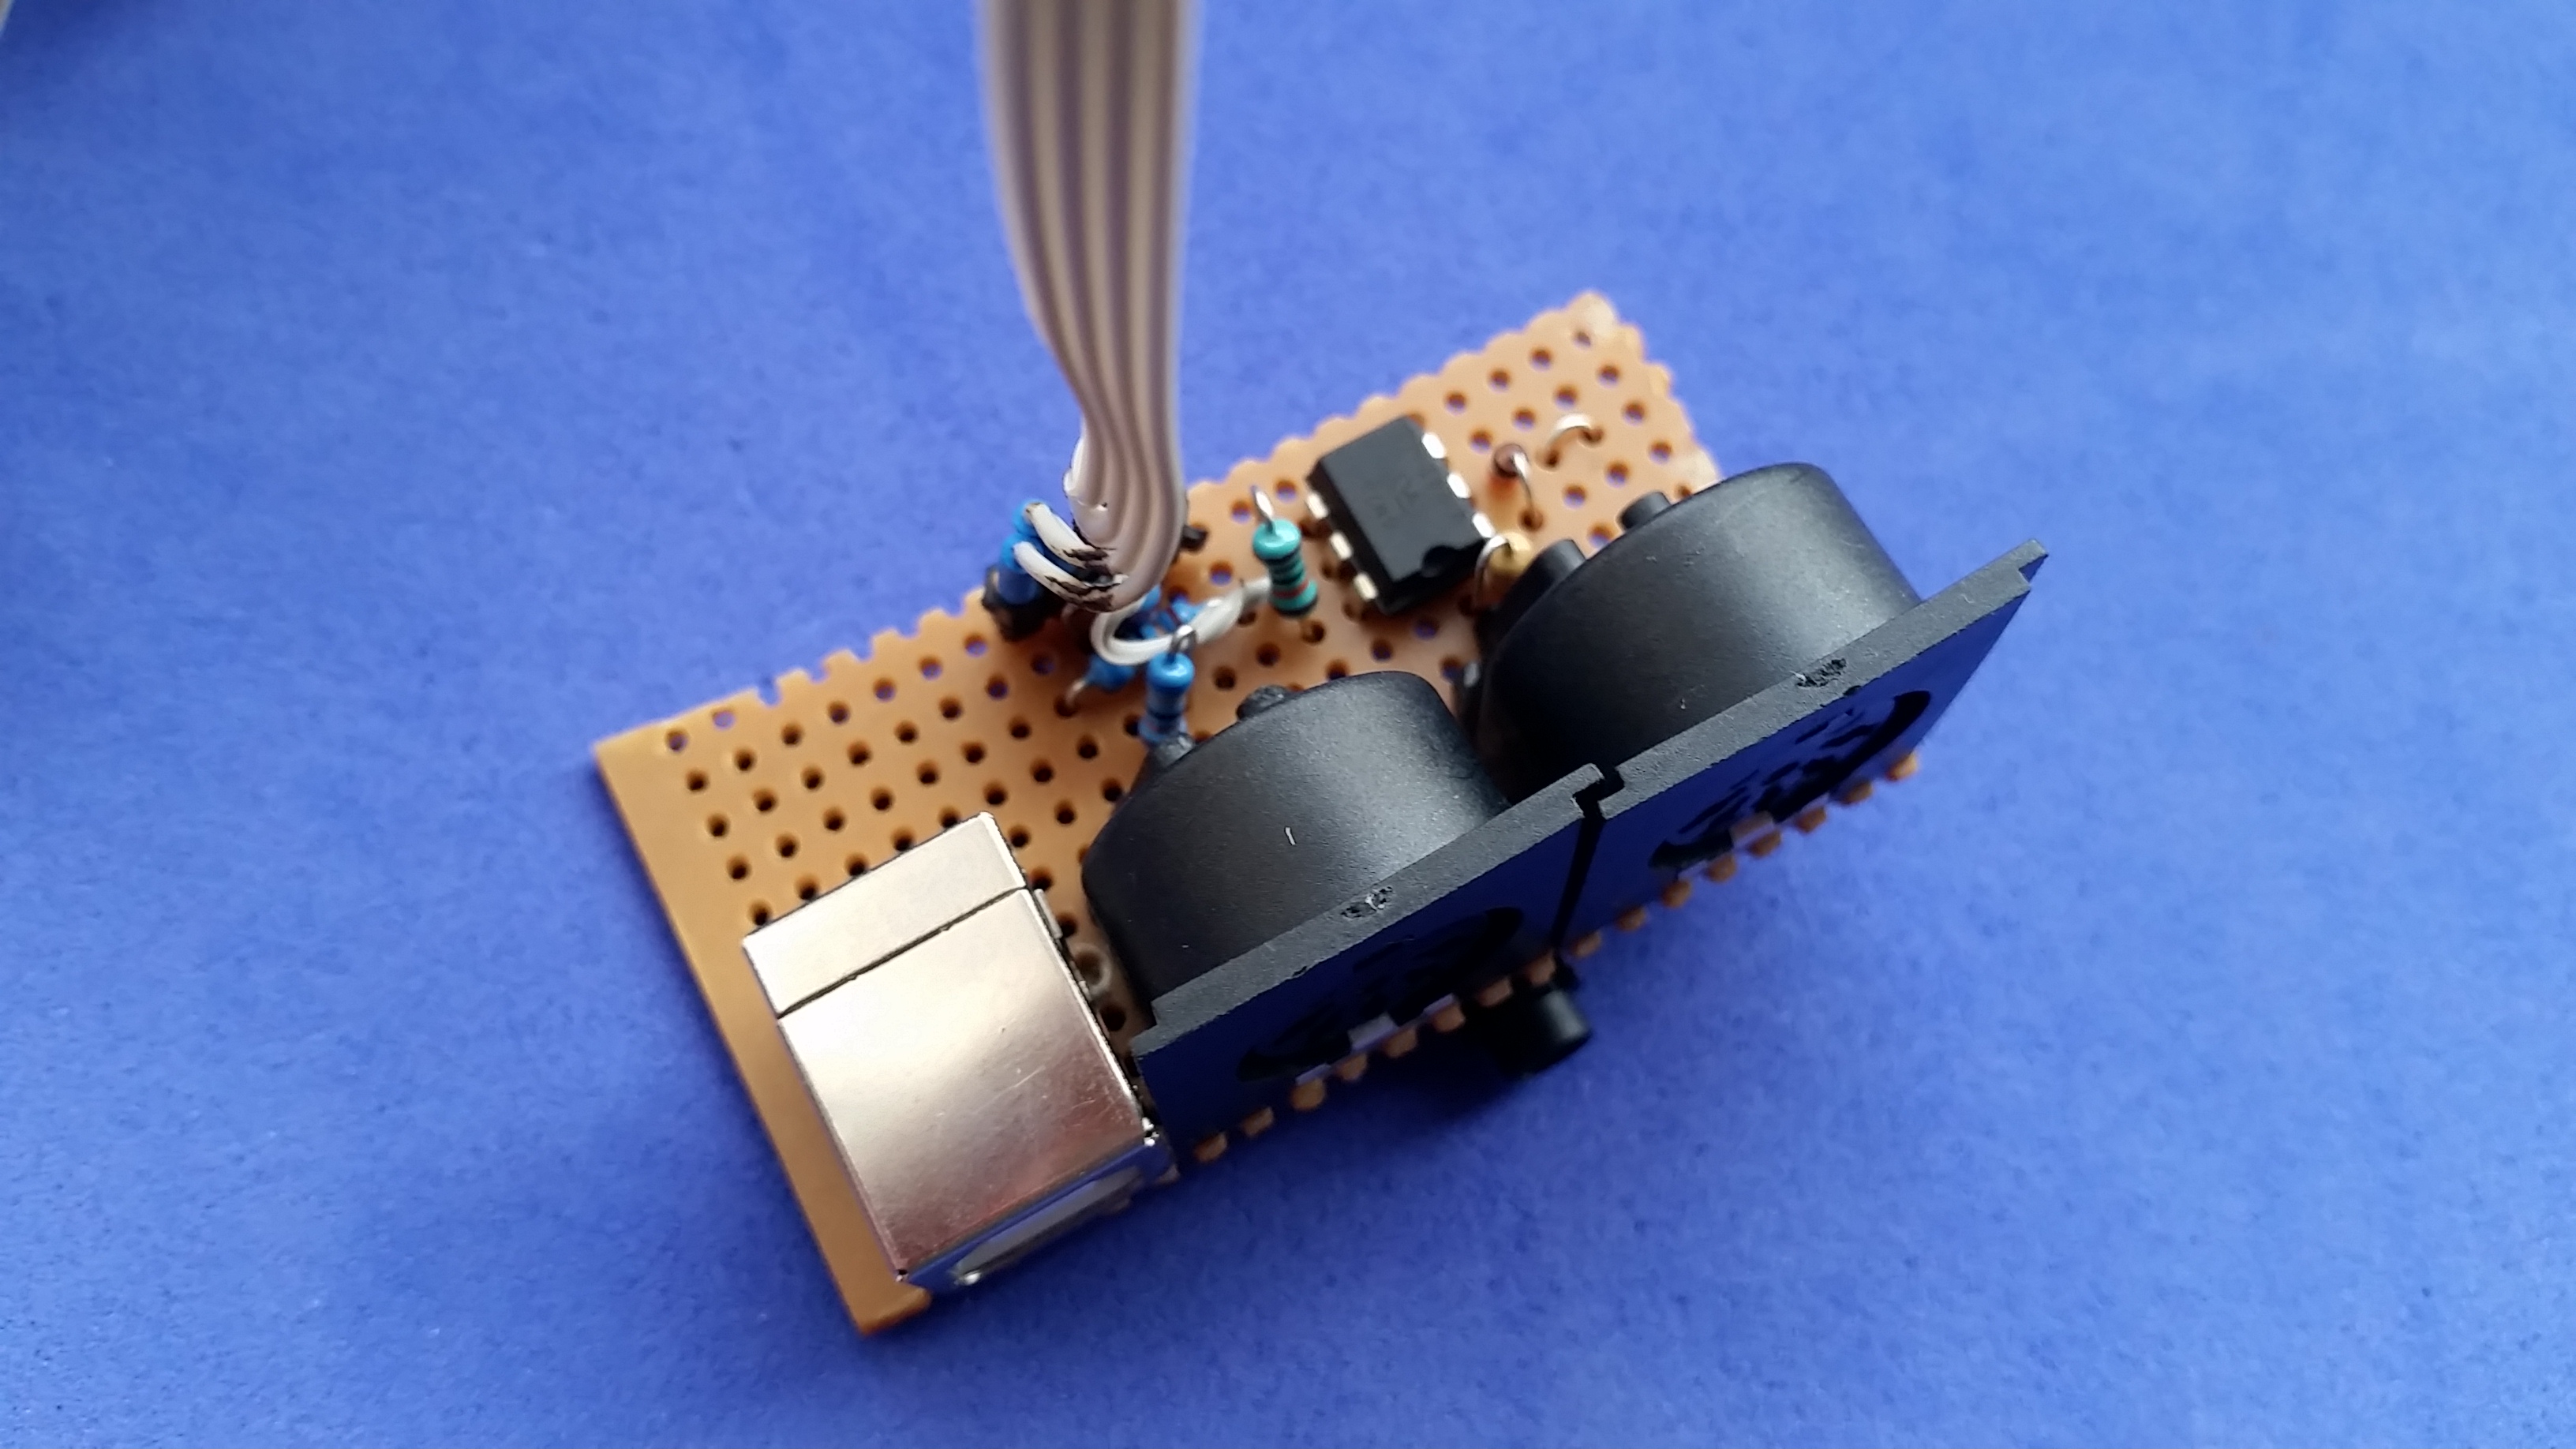 As mentioned above, the Teensy has a working voltage of 3.3V. This calls for a slight adaptation of the standard MIDI circuitry dutifully described on the Teensy page, namely: using smaller resistors for wiring MIDI Out to the TX0 output pin. I used a 4N28 optocoupler I had in my cupboards but all in all this is the very same MIDI circuitry you’ll find in a thousand Arduino tutorials.
Connecting the display
I used an OLED display by Chinese manufacturer Heltec that I found on Amazon. These displays are cute. They are as small as 25mm, and as they are controlled via a two-wire I2C interface, soldering to the Teensy/Arduino is done in no time. There is the standard Wire library for using the I2C interface with an Arduino, and there are a couple of OLED libraries around. I could only get the Adafruit SSD1306 library to work – the SSD1306 is the controller chip in the display – as, for example, the universal U8GLIB library seems to miss one important command for switching on the capacitor charge pump to convert 5V to the ~11V the OLED needs. I did not dive deeper.
Even the Adafruit library needs redefining to work with a 128×64 display (it is configured for 128×32 by default) but I ended up using a simpler library in the end – I felt that the Adafruit lib is very large, I felt obliged not to use it without a display bought from Adafruit, and I did not like the font. So I ended up using and adapting the OLED library by Deloarts that offers a simple, clean way of displaying an 8×8 font.
Of course, 8×8 is too small. Of course, displaying it with double the size looks bad. Of course, you could load a bigger font as well – which would use up precious memory (not that that is an issue here). Somehow, I got stuck with the idea of using the 8×8 font and enlarging it with an algorithm designed for just that – taking very coarse pixel grids, enlarge and smooth them. Voilá: enter Scale2x.
Adapting the Software
This is, sadly, where I spent most of the time I used for building this.
Scale2/Scale3x is an old algorithm designed for the MAME emulator, to display 8-bit games on much bigger screens. It has its own homepage. It tries to predict where lines and curves would be to add pixels for smoothing edges. As far as I can see, it is terribly outdated – algorithms like hq3x would probably be better – but it is simple enough that I could adapt it for the OLED library. You can find my fork of the library here. Apart from the scale2x/3x characters, the original code has also gained 8-bit support for extended charsets with Umlauts (using the CP437 code-page you know from MS-DOS right now, aiming for CP1252/ISO-8859-15 later), inverted characters, and a simple routine to print signed 8-bit values (which is useful for a MIDI controller). I did NOT add a proper println() routine – my understanding of C++ ends with overloading and inheritance – so there is work to do.
What the Teensy MIDI controller did better
Compared with the first iteration of my controller, I added:
- USB MIDI support – output the controller values, and the MIDI thru commands, on Teensy’s USB port as well. (This was super simple.)
- Debouncing (simply by adding the BOUNCE2 library).
- Either wheel can work as as a generic MIDI CC or a pitch wheel. Either push button, or the external foot switch, can send generic MIDI CC or Aftertouch (a fixed value only, of course).
- The routine reading the wheel can be configured with an offset, and a deadband zone. As the wheels allow for about one-third of the potentiometers‘ range, it assumes that this is enough to read with a maximum resolution of 256 – returning either a signed 8-bit or an unsigned 7-bit value.
- Configuration is stored in EEPROM, and read back after power-up. If the checksum is not correct, the EEPROM is initialized with default values. No need to reconfigure every time.

- A routine for displaying and editing the configuration settings.
- A calibration routine to set the offset and deadband values for the wheels.
The settings menu is called by double-clicking the top button. Top button is to step through the options, bottom button increments/selects, right wheel enters value.
There are a couple of errors here that need correction for this to work 100%. First, on the Fritzing diagram, the junction of the 2 LEDs and button needs to connect to ground. (the schematic diagram is correct)
Also, in the code, the teensy pin assignments are not all correct. It should be:
#define BUTTON_B 15 // Right button (was 16)
#define BUTTON_C 13 // External button (was 15)
#define LED1 16 // Top LED signals MIDI input (was 15 as well)
Other than those, it works great! Thanks for sharing this!
Bloody hell – you’re right! Don’t know what I uploaded there, as my code seems to have worked (I never tested the external input TBHM; maybe my prototype contained a soldering error.) Fixed it on the Github repo. Thanks a lot, and glad you like it in spite of the errors!
Pingback: Reviving an old foldable keyboard with a Raspi Pico - untergeekuntergeek