A small project to reconnect an old Targus Stowaway Handspring keyboard with the modern computer world, and learn some more Raspi Pico Python in the process.
- Project repository: https://github.com/untergeekDE/stowawayPicoUSB
Around the turn of the millenium… Oh my God. I’m reminiscing again. But it’s important for the story, so I’ve got to keep going. Sorry. …in 2000 and 2001, I spent a lot of time travelling. I didn’t have a laptop then, but I owned a Handspring Visor PDA (🌐 Wikipedia) – a class of pocket computer with a touchscreen operated with a stylus, and capable of simple tasks like composing text, sending and receiving e-mail, and even open the occasional web page.
This device only became useful after buying an important accessory: a foldable keyboard. A company called Think Outside made the “Targus Stowaway” keyboard. It consisted of a keyboard divided up into four segments that could be slided apart, and fitted into a metal casing that locked and unlocked with a satisfying click.
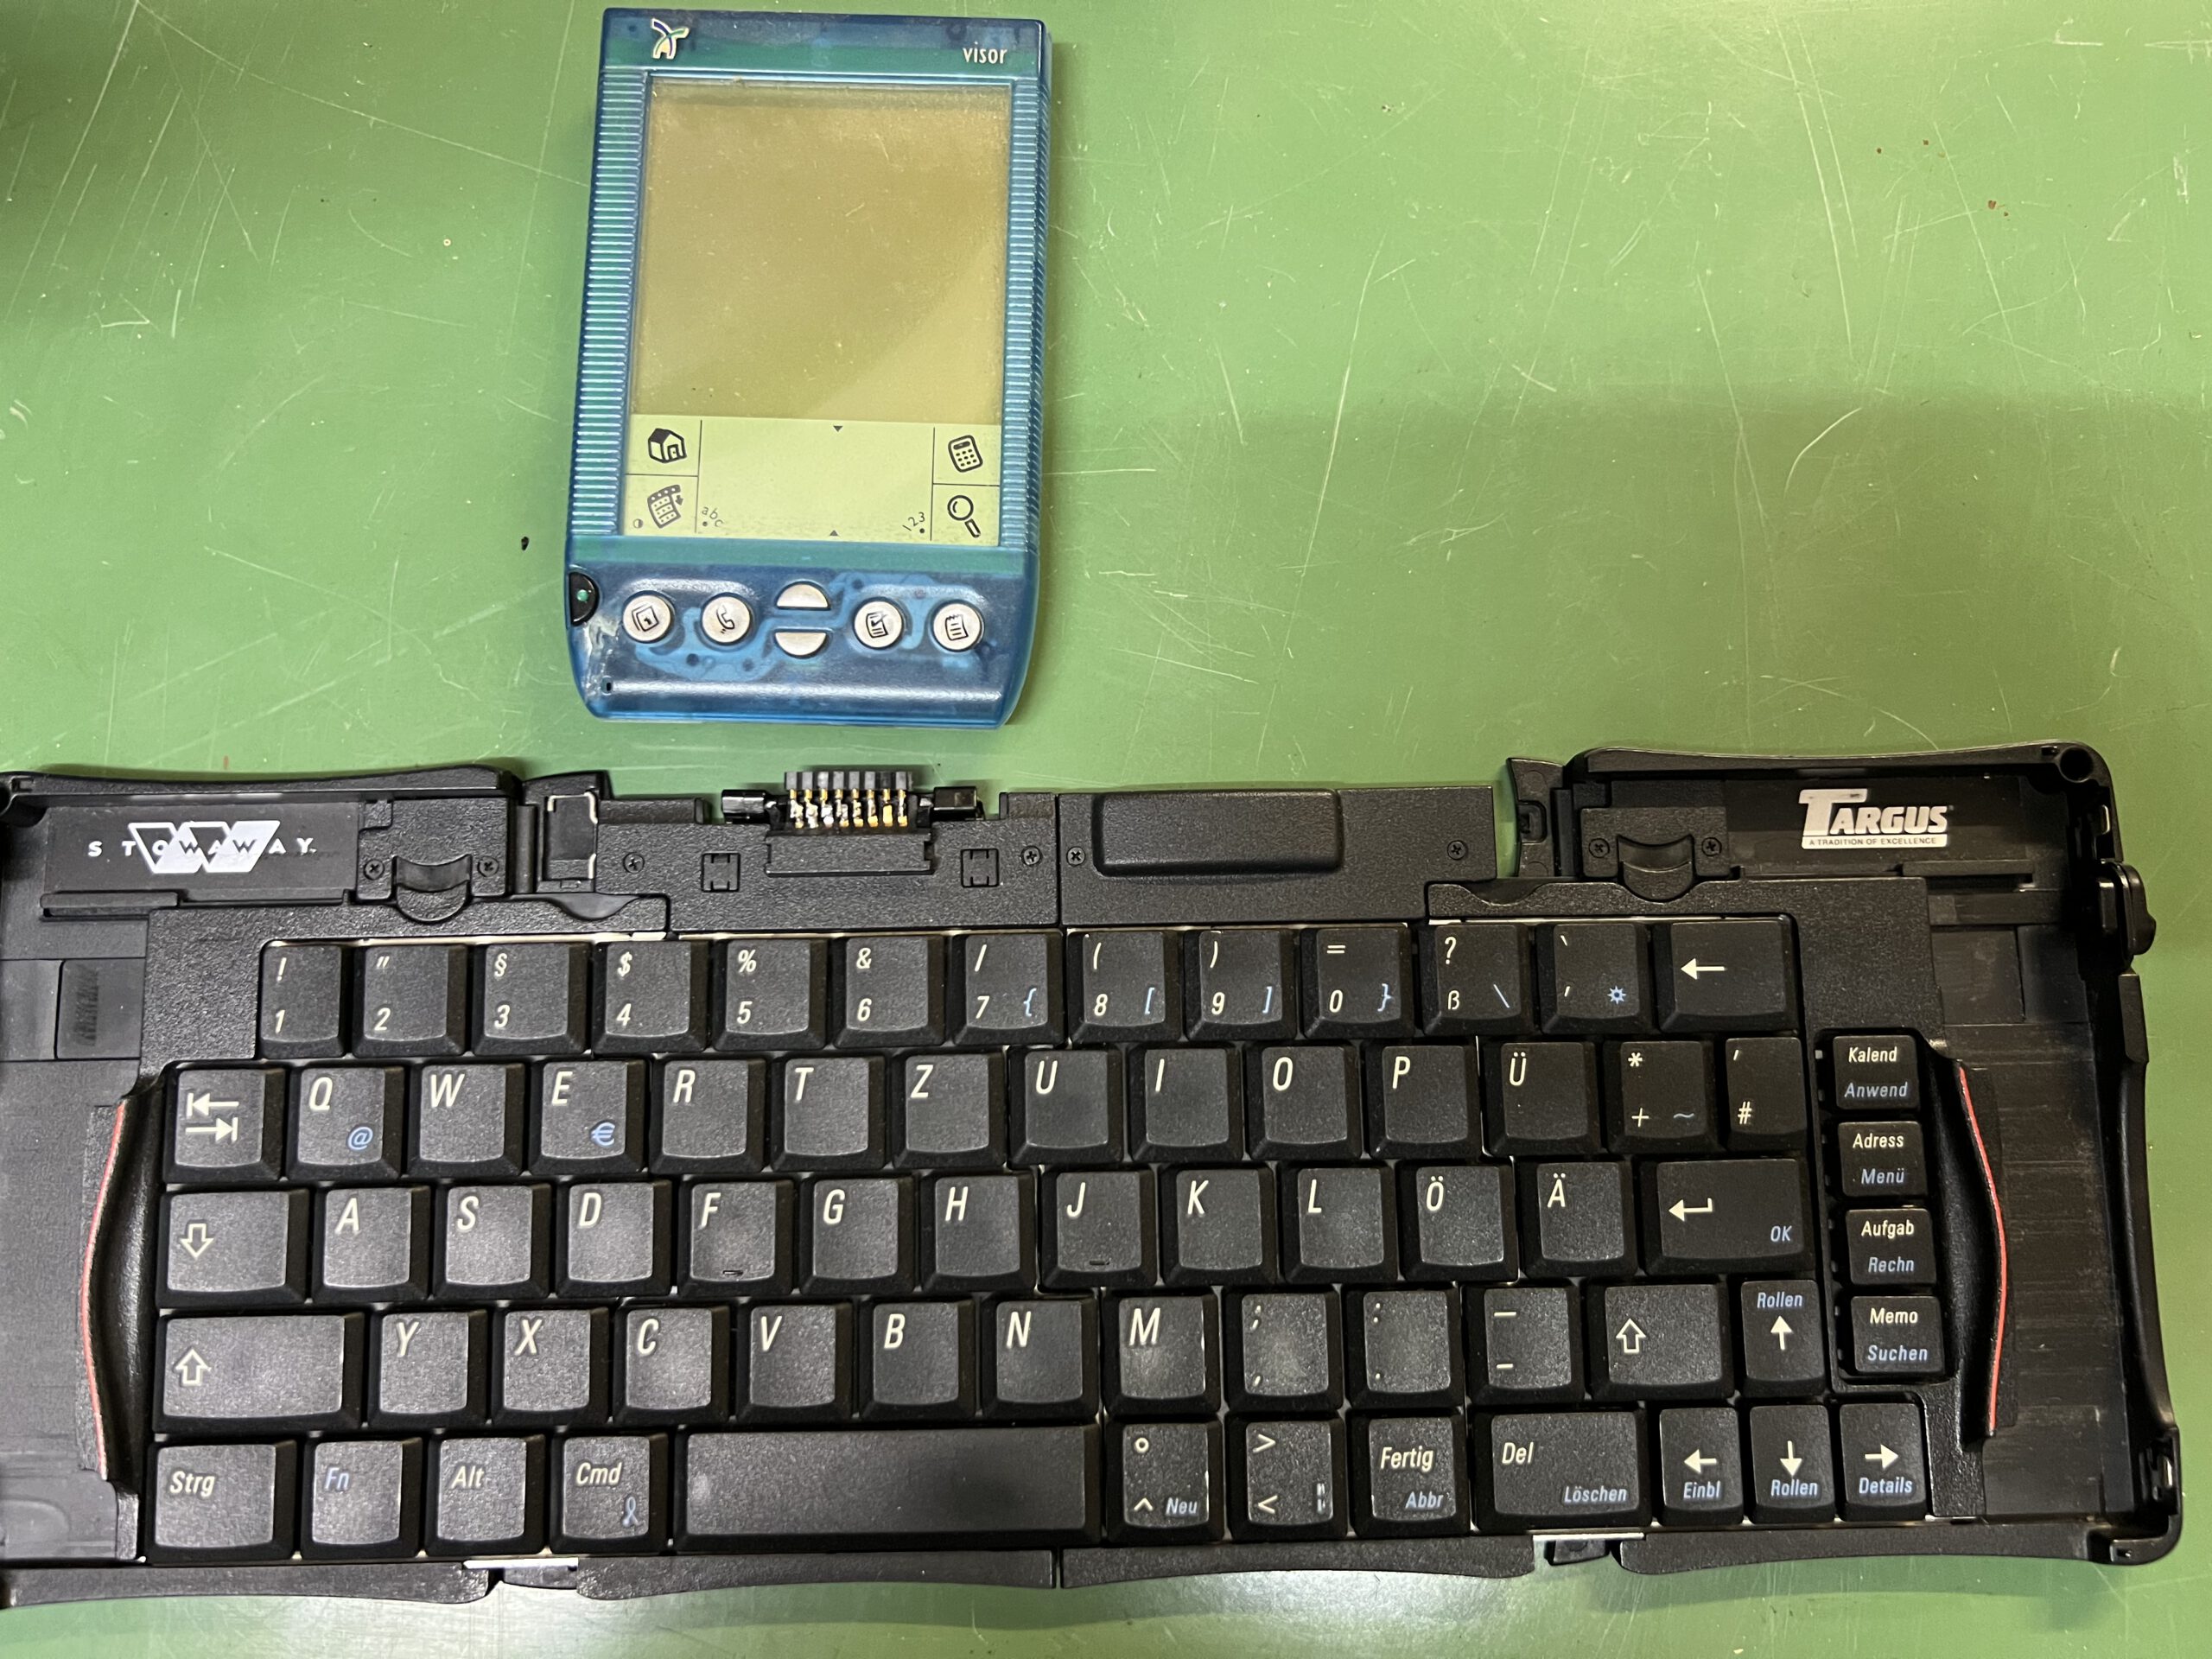
Handspring Visor Deluxe in transparent blue lying next to a fully unfolded Stowaway keyboard
So when I had to work on the train, I took the Visor and the keyboard case from my pocket, unlocked the case, unfolded the keyboard – to many a dropping jaw with the other travelers around me – and started typing away.
With a Siemens S35 phone (🌐 Nixdorf Museum) placed very carefully next to the Visor, I could try to connect the two via infrared data exchange, and with lots of good luck and repeated attempts, I could send and receive e-mail via the feeble German mobile data network. Magic.
Reviving the old technology
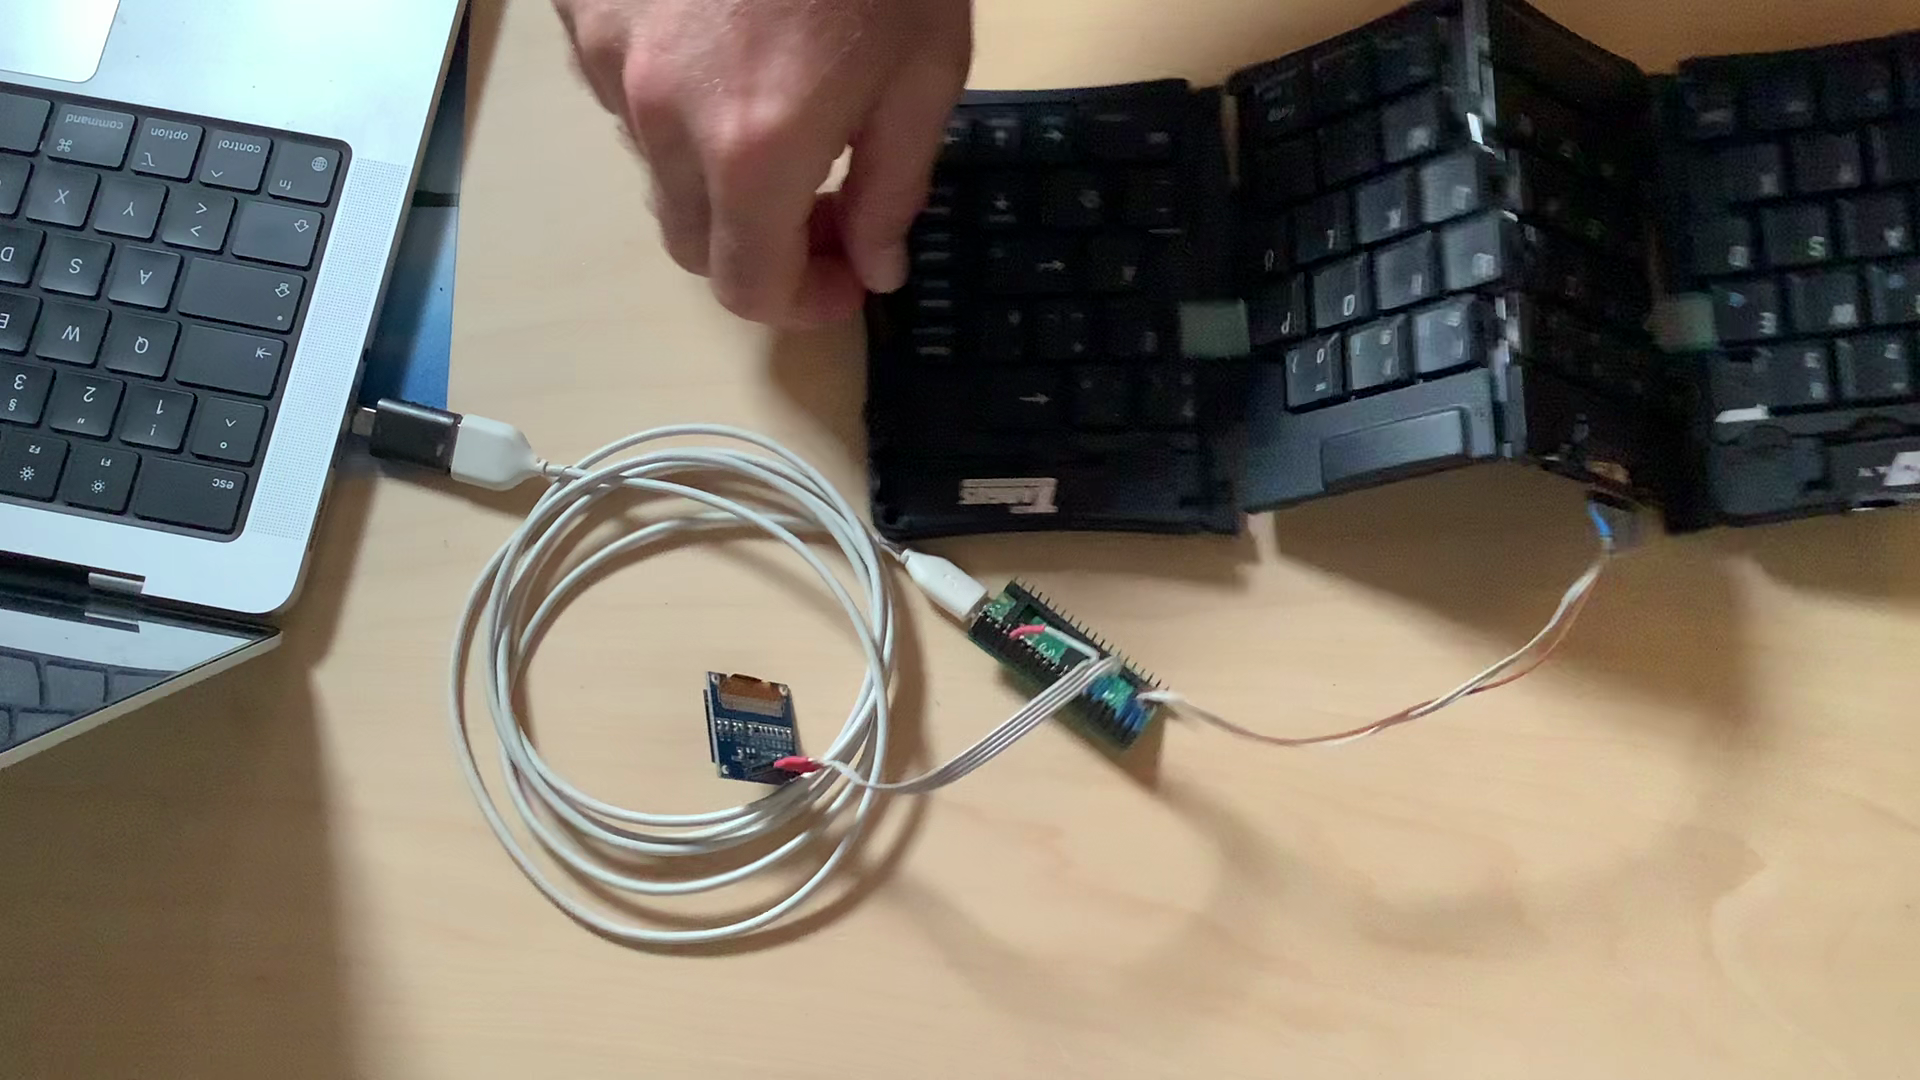
As I know only too well: This ancient magic tends to stick. So when I found the keyboard in one of my drawers, and had successfully learned how to work with a Raspi Pico and MicroPython, I decided to make an attempt at reviving the keyboard – granting it a second life as a standard USB keyboard.
Back when Targus made the Stowaway keyboard, it was still quite common to offer technical details on the technology to end users, so the Handspring and the Stowaway keyboard are quite well-documented. They communicated via a 9600-baud two-wire serial connection, and all the details can be found in the manual for the Stowaway keyboard. To my knowledge, maker Think Outside no longer exists, so I consider this manual to be abandonware and have uploaded the Handspring parts to a PDF documents in the project repository.
The punchline:
I got the driver to work pretty fast – only to discover that a scanline in my Stowaway seems to be broken so that three keys do not work, including the space bar. Got to repair that, so in the end a small project created more items for my eternally growing to-do list.
As always.
But then, here you are. Notes on how to build that stuff.
Hardware
This is super simple. The Raspi Pico connects to the serial bus via two wires. One of the Raspi’s digital ports serves as a power supply line for the keyboard, which is part of the protocol: Activating the power supply causes the keyboard to send two handshake bytes to show that it is ready.
To see what I am doing, I connected a cheap little OLED display to the Pico. I have been using these before; they are controlled via I2C and offer 128×64 monochromatic pixels. More than enough.
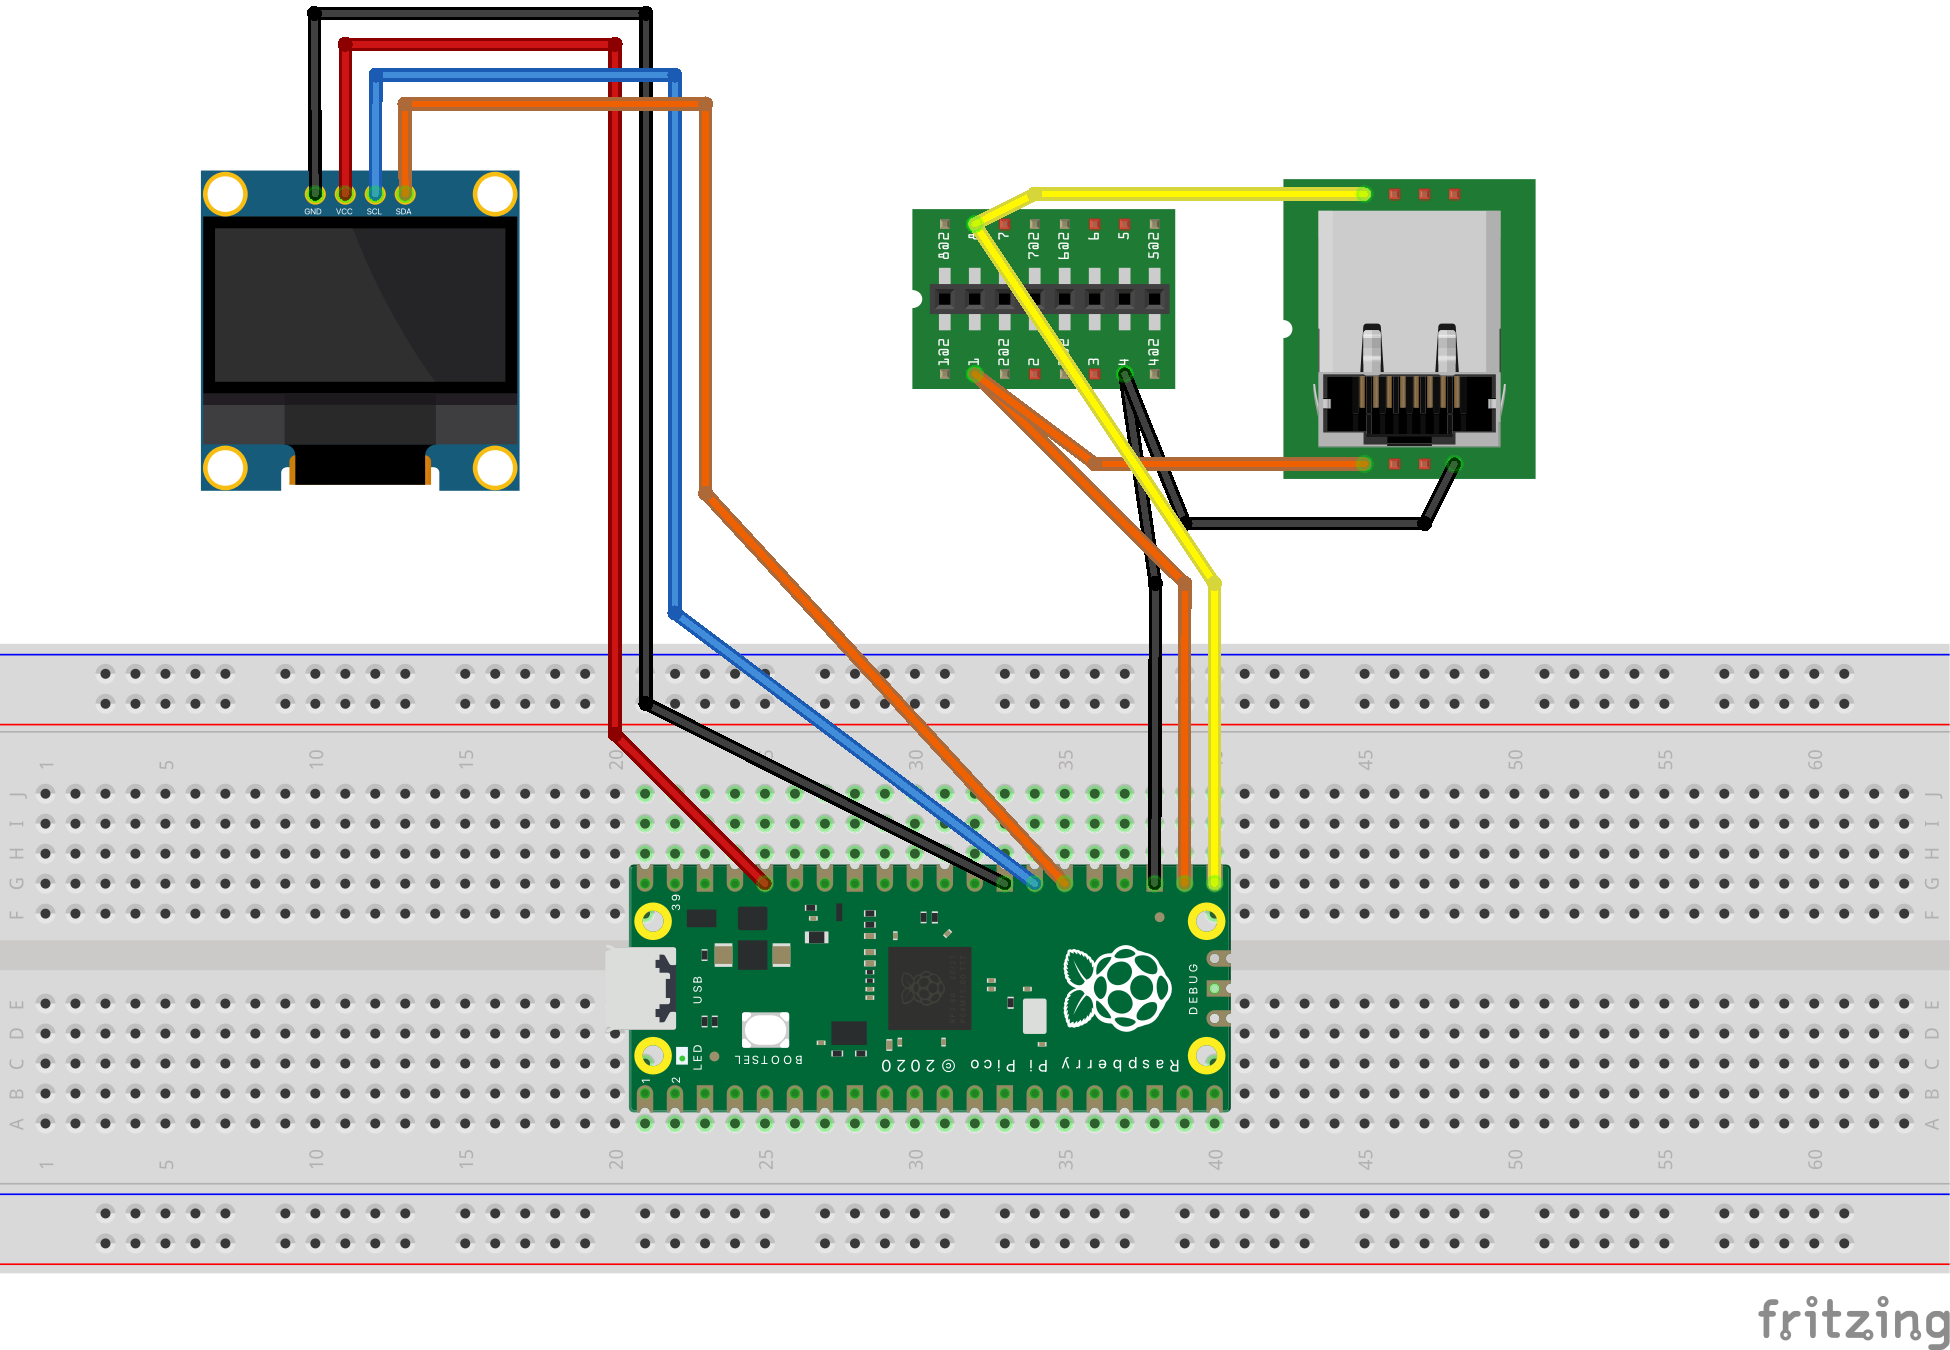
- Raspberry Pi Pico Pinout (🌐 Elektronik-Kompendium)
Working with a Raspi Pico
If you haven’t worked with a Raspberry Pi Pico before: They are incredibly cheap (5€ each), they are more powerful than the older Arduino-class minicomputers, you can even get an Bluetooth- and WLAN-enabled variant called Pico W – affectionally called the Pi-Cow – and you can program them either from the Arduino ecosystem, or via Micro Python.
Micro Python is a stripped-down Python variant that plays nicely with editors like VSC: Connect the Pico to a host computer, copy the MicroPython firmware to the drive, and develop in the VSC editor, or its fork Void (🌐 project page): With the MicroPico extension you get a REPL terminal – meaning that you can type actual commands that are executed by the Pico’s Python interpreter – upload code, and run it.
Working with Circuit Python instead of Micro Python
Unfortunately, not all hardware is supported by Micro Python. While it is easy to find support for the SSD1306 display, there is no library which supports USB HID, e.g. allowing the Pico to mask as a USB mouse, keyboard, or joystick.
The great people at Adafruit maintain a fork of Micro Python called Circuit Python which has a library for USB HID support, as well as for the many other hardware extensions they develop and sell.
So this is how you get going:
- Connect a virgin Raspi Pico to your computer – a USB drive named
RPI-RP2appears in the file system - Download and copy the Circuit Python .uf2 file to the RPI-RP2 USB drive** – file and instructions here on the (🌐 Adafruit Page). You may either use the 9.x or 10.x version of Circuit Python, just be sure to pick the matching libraries in the next step.
- The Pico reboots now and registers as a USB drive called
CIRCUITPYnow. - There’s a VSC extension called “CircuitPython V2” on the 🌐 VSC marketplace.
- Once the initialized Raspi Pico is connected, you have to set the board to “Raspberry Pi:Pico” in the selection on the lower right edge of the VSC window; then click on the connector symbol next to it and pick the correct USB interface for the Pico (it’s “`/dev/tty.usbmodem2101“` on my Mac)
Working with Circuit Python in VSC is a bit different from Micro Python in that your project folder is actually the CIRCUITPY drive; whenever you change a file, the code is reloaded and rerun. You can also access the REPL interface by pressing Ctrl-C once you have established the connection.
- Look at the 🌐 Adafruit Tutorial for working with VSC.
You need a couple of libraries…
- Get the Adafruit Library bundle (🌐 download page); as mentioned above, it needs to match your Circuit Python version.
- Find and copy these libraries to the
/libfolder on theCIRCUITPYdrive:adafruit_hidfolderadafruit_displayio_ssd1306adafruit_display_textasyncioadafruit_ticks(needed for asyncio)
Clone my project (🌐 github) to a local folder (or get the src/*.py files). Copy main.py and stow_kbd.py to CIRCUITPY root folder. You may have to erase the code.py default script from the folder.
The code
is a partly vibe-coded crude proof-of-concept to scan the keyboard, convert the scancodes to USB keycodes, show keypresses on the display, and send them via USB.
All the nasty stuff – picking the keyboard layout, repeating keystrokes for keys that are being held, and interpreting SHIFT or other modifiers – are done by the USB host. With one exception: Combinations of a pressed Fn key with a number key are caught and converted to FN1..FN10 keys.
More annotations in the Github repo – and please note that the code does not yet catch timeouts, and sometime tends to repeat keys in eternity once a key is being held. (There is a note somewhere in the Stowaway documentation about this; you might want to fix this.)
Coding with AI
If you like an AI to help you coding, have a look at the 🌐 VOID project which is an AI-enabled fork of VSC but without the annoying Copilot. Use Mistral’s codestral model for autocompletion, it’s fast and cheap and good. It’s available locally via 🌐 Ollama, and there’s a special API key from Mistral which allows you to use the faster cloud variant for free.
For agentic mode – i.e. “Write a routine doing this”, or “Fix problems in code”, working options are mistral-medium-3.1 (fast and cheap) or claude-sonnet-4-0 (good but not cheap).
Local models under Ollama are another good option; I like qwen3-coder very much but tool use – and thus agentic mode – does not seem to work in Void with it right now.
As always, remember that the AI will produce code for you but it will not think for you. So:
- Try to understand each and every line of code the AI produces.
- If there are errors, try to understand them with the AI rather than having the AI fix it.
- Be aware that AI tends to use outdated code and may produce rather catastrophic errors.
- As longer chats/contexts produce worsening results, try to work in smaller chunks: have the AI work on the module level, and start a new chat/agent from time to time.
- Remember that when you are using a cloud service like Anthropic or Qwen, you are transferring data to a company in a country controlled by an authoritarian regime. Use a European service like Mistral, or local AI, if you can.
cool, thanks, that was interesting, I’m trying to make a keyboard for a pda(pocket pc 2003/windows mobile 2003/2005), and your article was helpful